Find Select Projects Easier

If you're looking for a specific project that I've done, please click here for a categorized list page.

Don't Forget To Leave A Comment

If an article interests you, please click below it where it tells the number of comments and leave one. I appreciate all input.

Get My Blog In Your Email

Enter your email address:

Delivered by FeedBurner

Sunday, November 18, 2012

Simple Isn't Always So Simple

I have got to quit using the word simple when it comes to projects. My Mom needed a simple table to place upon it a small stereo she has. She provided me with the details of what she wanted and it seemed simple enough. See that word? Simple?
There is nothing complicated to any experienced woodworker about a table. Of course, I wanted to add my own spin to this table, but still, it seemed simple. There I go using that word again.
I started with the skirts. I decided that I really would like to include finger joints in the corners to add character to a simple design. This part worked fine. If you keep up with my blog, you probably remember the fancy finger joint, or box joint, machine I made earlier this year. I have used this machine on numerous projects now and it has got to be about the most useful jig I own, built or store bought.
Next, I wanted the legs to blend well with these "different" skirts. I notched the tops and middles to accept the skirts into the legs, making it all flush along the corner edges.
It's when I started gluing everything up that it all seemed to go south. I learned an important lesson with this project. Make sure your shop is warm enough before attempting to use Gorilla Wood Glue. The day I glued all this up, it was sixty degree. This is barely within the operating temperature listed on the bottle, but I thought I'd be fine.
After everything was together and I started sanding, I kept hearing an unusual noise. It was my glue joints popping loose when I racked the entire assembly around to sand the different sides. This created a problem. Most of the joints failed, but I still could not completely disassemble it to reglue everything. I wound up fixing this with a syringe of glue to get behind separated pieces and a 23 gauge pin nailer.
At this point, I was sure glad I had used finger joints at the corners. Without those strong finger joints, I don't know if this would have held together.
To tell the truth though, I was not happy at all. At this point in a project, I normally would have given up and started over to feel safer that things were right. I believe in doing things right, or not at all. The problem is though, I wanted to make this for my Mom out of mahogany, and I already knew that I did not have any more mahogany wide enough to redo these skirts. So I needed to push on and see this thing through.
Things got a little sturdier after adding stretchers. These helped push the legs tightly into the corners of the skirts so the legs did not have to depend so much on glue. They also are where the top will be attached down to, and the shelf underneath.
Then I started with the top and shelf and run into even more issues. I get ahead of myself sometimes. In my head, I had planned out this extravagant inlaid top and shelf. Therefore, I used particle board as a substructure to assure a dead flat surface to work with. What I didn't take into account was, with the angles my idea had me working with, every piece of mahogany I had to work with was either too short, or too narrow.
After a better part of a day trying to figure out a way to make it work, I had to come to my senses and change gears to something a little simpler.
I made quarter inch thick panels to cover the horizontal surface. I chose mahogany board with different shades of colors for a reason. Then I used a bevel jig on the table saw and ripped them at an eight degree angle so I could mix them up when I glued them down.
 
 
After all this was done, and the sanding was done, and the kicking myself for the mess this simple project had turned into, it was time for finishing.
No, finishing did not go well.
I have gotten better in the last year or so at finishing. For some reason though, this has to be the worst finish I have done in a long time. I planned on two coats. I wound up making three just trying to even out the unevenness in color that the first two coats made. When it was all said and done, there is no way to fix it, short of sanding down and starting over, and I know from experience that this is not a good idea either with shellac.
Of course, my wife says I'm worried for nothing. I am my own worst critic sometimes. I can see every single flaw on this thing though, especially in the finish. At this point, I need to figure out what I'm going to do. It will be sitting in my shop until I can get it to my Mom. In the meantime, I have to decide whether to chop it up for fancy firewood and try making another one, or living with it not being my best work and hoping my Mom will like it anyway.
I will have to look at it again in the coming days and weeks, when I'm through beating myself up about it, and come to a decision then.
 
I try to learn something with every project. The biggest lesson I have learned with this one I think, is to stop saying anything will necessarily be simple.
 

Friday, November 9, 2012

New Addition To The Band Saw Line Up

Some of you may remember that late last year, and into early this year, I built a band saw. Since then, I have really put it through it's paces. That thing is a beast and has taken anything I have thrown at it without so much as a grumble. In addition to that, it has proved to be more precise than the several factory made band saws I have owned.
Now, the thing is, I built this saw in conjunction with a good friend of mine. Most of the work was done at my shop. My friend took his back to his shop back around the time I completed mine. I have been considering building another one of these.
Since getting used to a larger and better saw, I have been extremely dissatisfied with the performance of my old Craftsman saw. It is a good saw for general work, but mostly I have been unhappy with the lack of precision. I use this saw mainly for curved cuts, since I do all my re sawing on my shop made saw now. I always cut outside the line though and sand up to it, simply because I don't trust the precision of it.
So, when I mentioned this to my friend, he offered to bring the saw back to me. For various reasons, he has decided that any large work that he can't do with what he has, he'll just bring to my shop. I jumped at the chance to get this saw back to my shop. Since I know it is built identical to the other shop built saw I've been using for a long time, I know it is a great saw.
The first thing I had to do was build a stand for it. I made the stand you see in the first photo of this saw. It is just a simple square cabinet with three drawers. There's nothing really special about it. I made it quickly out of cottonwood.
Next I added a guard to it. I decided to do this one a little different than the other saw. On the other saw, I wanted overly safe guards. Because of my sometimes re sawing long or large wood, I sometimes need help on that saw, which is usually one of my sons.
On this saw, I will be using it for curved cuts and I'll be able to manage everything on it by myself. Therefore, I wasn't quite as careful with the guards. For this one, I wanted something simple that protects the operator, while still allowing easy blade changes. This is because, depending on what I'm cuttings, I'll be using more than one blade on this one, unlike the other saw that keeps a half inch re saw blade on it at all times.
So, I made this guard a hinged model with latches on the front to hold it closed when using the saw. This makes for easy blade changes. The saw is ready to use now. I just have to get a smaller blade. For the time being, it has the same half inch blade as the other saw.
As soon as I get the smaller blade, so I'll have a saw to cut curves, and as soon as a different friend can make it to Vicksburg, I've found a new home for the old Craftsman. I hope my friend gets as many miles out of it as I have.  Maybe one day I'll be able to talk him into letting me help him build a shop built saw as well.

Tuesday, November 6, 2012

Iron Horse Wall Hanging.

This is just a fretwork wall hanging I finished cutting today. I ordered the pattern from here at Wildwood Designs. It was not a hard cutting, but a lengthy one. I stack cut two and one time, but it took me about twelve hours to complete.
If you order the patterns for this cutting, you can cut it as a wall hanging as you see here, or you can cut all of the pattern and build a shelf out of it. The pattern, as ordered, comes with two different designs. They are each similar, but different in subtle ways. I didn't understand the difference in them to begin with. Upon closer inspection though, they depict trains from different time periods.  
Both of these are made of cottonwood. I left one unfinished and the other one I spray painted gloss black. They measure seven inches tall at the highest point and fourteen inches long.
One of these is going to a friend of mine who lives in another state, and the other one I hung inside my shop for myself.


Friday, November 2, 2012

More Loading Blocks

Some of you may remember the loading block I made for my Dad a few weeks ago. If not, you can read more about it here.
Anyway, I'd been wanting to make some more, but am just now getting around to it.
In the S.A.S.S. group, my Dad is Gunn Walker. The other block you see, is for a good friend of my Dad, Mean Matt McCord.
The top and bottom ones are made of sapelle. The middle one is made of glued up layers of sapelle and cottonwood. The letters are routed into the top. Then the recesses are painted black. Then they are finished with Watco Danish Oil.

Wallet Size Photo Frames

A friend shipped me some lacewood and birdseye maple a while back. You may remember it as the wood I built the lamp for my wife with. Well, I wished to do something for him. Even though he insisted that it was not necessary, I convinced him to tell me something he needed. He says he had some photos of his daughter that needed frames. He hadn't been able to find any, because they don't really make nice frames much for wallet size photos.
So, I took patterns out of the book you see above. The patterns are actually sized for four by six photos, but I done an overlay to reduce down to two and three eighths by three and three eighths size photos.
The top, darker frame has a piece on back to allow it to sit upright on a desk or shelf. The other two are meant to be hung on a wall. All the darker wood is sapelle and the lighter wood is cottonwood. They are finished with Minwax Wipe On Polyurethane.

Friday, October 19, 2012

Drill Press Table

 
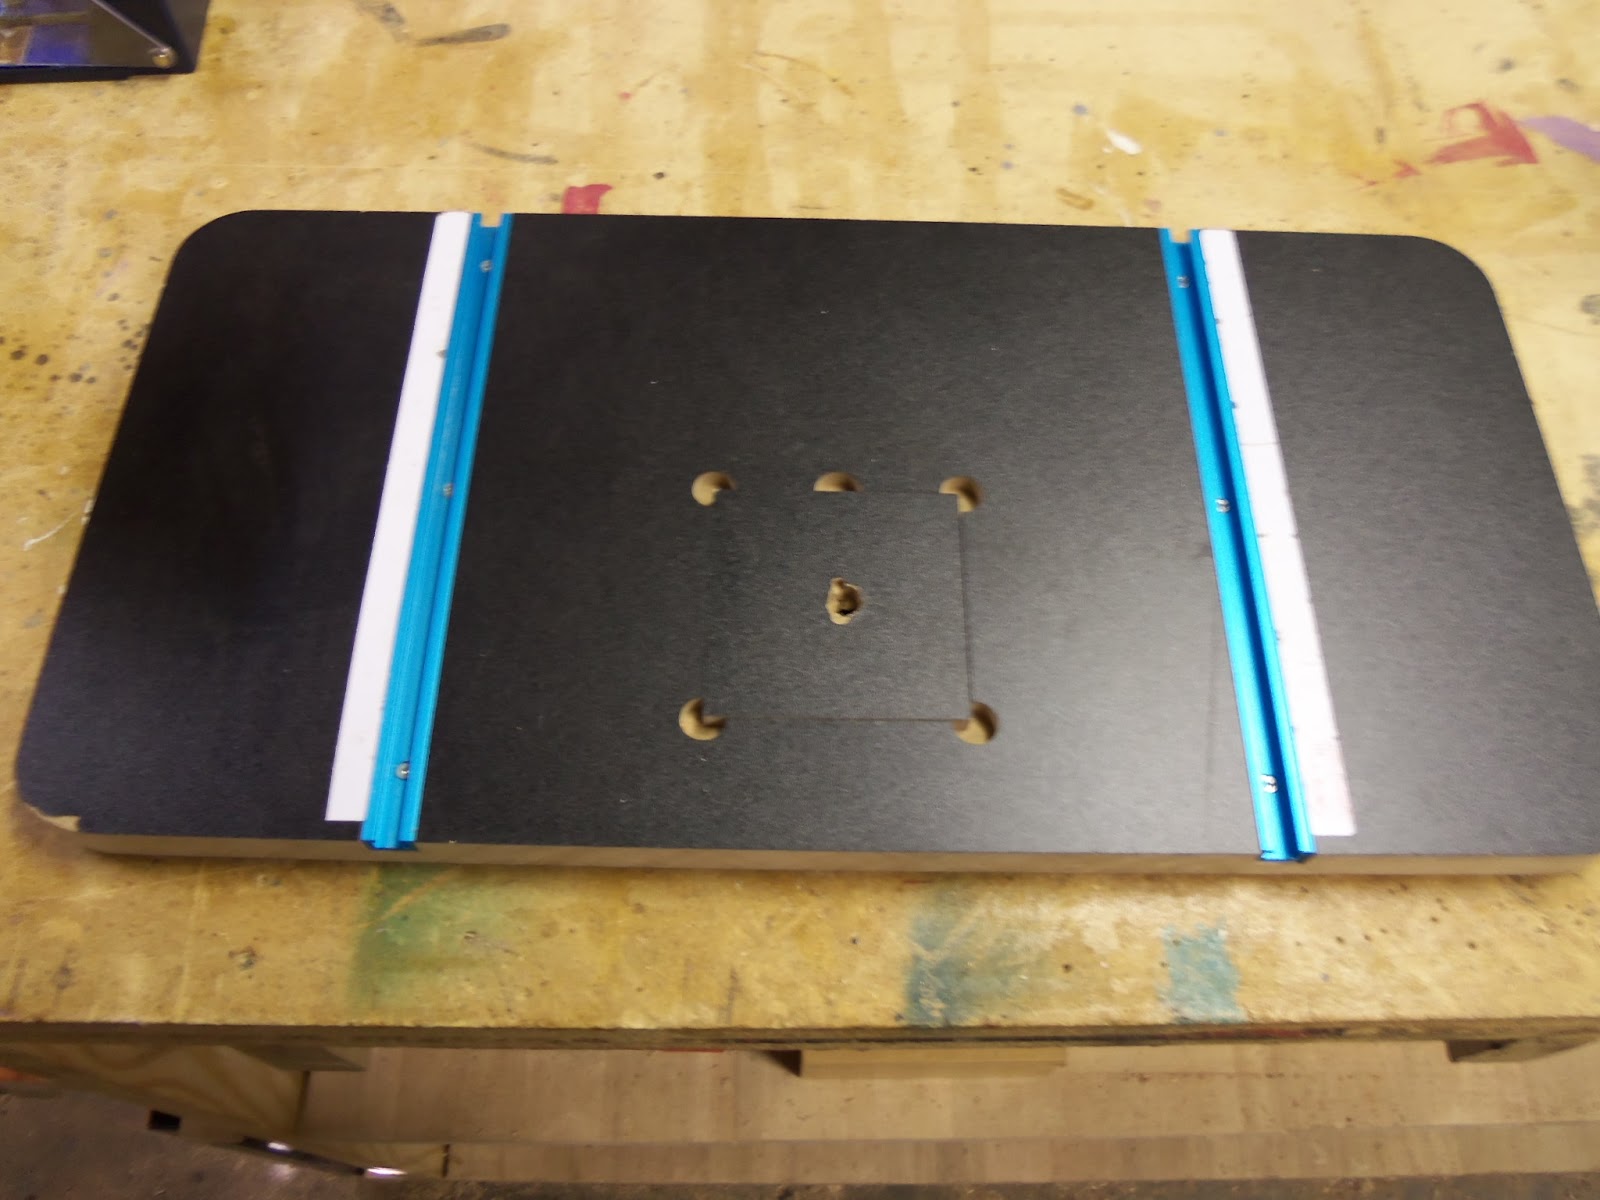
For some time I have been unhappy with my drill press table. I bought this thing at Harbour Freight. I got it cheap because I had no intentions of using it permanently. Unfortunately, because of various reasons, such as just not wanting to get started on it, I still hadn't gotten around to building anything better. This table, actually, is a pretty good one. It probably would be perfect for a smaller, table top version, drill press. For my big floor model though, it just wasn't large enough. One of the advantage to a drill press table is the ability to use a fence. With this small table, the fence went only about two inches past the quill. Therefore, anything with holes further than that from an edge, and you were still without the use of a proper fence.
 
Then I recently seen a neat shop made drill press table on a freind's blog. I immediately thought about building something similar. A few days ago, I set out to do just that. I started taking measurements and planning. As I took a break though, I sat there over coffee and had a thought. What was I doing? Yes, my friend had built one nice table. However, I did not need or want all those neat features he incorporated into his. All I really needed was a simple table that was large enough. Yes, all the bells and whistles are nice, but what good are they if you don't need them?


So that's what I done. I am happy with this table and it has everything I need in a table. It is large enough. It has a workable fence that slides all the way back to the post, giving me maximum usable capacity. It has a replaceable insert. It has parellel T-track so I can clamp things down if needed. What more can you ask from a drill press table?


I made it out of pecan. I use pecan for a lot of my shop made accessories. There is no special reason for this besides I think it is a beautiful wood and it is stable enough for most things. Because a drill press table needs to stay flat though, I backed this piece of pecan with a three quarter inch piece of plywood.
For now, I'm still using the fence from the old table. I only have three quarter inch thick pecan. I want a solid fence without lamination. So as soon as I can find me a thick enough piece of pecan, I will make a matching fence. Until then, the MDF from the Harbour Freight model will have to do. 


Loading Block

My Dad is a member of the Single Action Shooting Society. If you'd like, you can read more about that great organization here.
He uses something called a loading block, which you see above, during competitions. The one he has somehow has gotten a chunk broken out of one corner of it. So he brought it to me around a year ago to make him another one. I told him too because, from looking at it, I thought it would be simple to make. I forgot something though. Sometimes, the simplest things can turn out to be difficult.
 
First, I'll show how this works, then I'll explain why it was difficult.
My Dad uses a .45 Long Colt shell. As you can see from this photo, opening the lid exposes the primer end of those shells. The lid protect the primers from getting hit, while also keeping the shells pushed down into the block.
With the lid closed, you can see how the bullet end sticks out the bottom. I know, this in the photo doesn't look like a normal bullet. Actually, it is empty brass. I don't own a .45 Long Colt, so all I had at the time I took these photos to show was some empty brass my Dad left for me to do this project.
With the lid open and the block set down on a flat surface, the shell is pushed upwards, making them easier to grab ahold to.
 
Now, why was this so hard?
Well, at first I though this was just a block of wood with a bunch of holes in it. All I had to do was use the empty brass and find the right size hole. What I did not take into account though was, with all those holes so close together, the wood would tearout, and sometimes just bust out, when the drill bit exited the bottom of the block.
I tried several different ways to get this done successfully. I tried twist drill bits, brad point drill bits, modified drill bits, forstner bits. I even filed down a router bit hoping for success. Everything produced the same results when exiting the bottom. It didn't matter how tightly I clamped it to a backer board. It was just too many holes in a small amount of space.
Then a few weeks ago, I was watching a wood working video on the internet. This guy drill a bunch of holes. To prevent tearout, he explained, he drilled stopped holes within a quarter inch of the bottom and then cut off the bottom, leaving clean holes. As soon as I seen it I had one of those "duh" moments. Although it was late in the evening, I couldn't wait. I had to get to the shop that instant and try this out.
So, although the block section is only seven eighths an inch thick, I started with a block that was over an inch thick. I drill all the holes, then used my band saw to slice off the bottom. It humbled me to figure this out after all this time.
For a year my Dad has been waiting on my to do this. I imagine at time he may have thought I'd forgotten about it. It took only getting the right idea on how to do it though, and it was an easy project. Look for more of these in the future. Now that I know the trick, I have a couple of ideas on more personalized versions.


Wednesday, October 17, 2012

A Story Of A Lamp


Today, I finished a lamp that has taken me the better part of two weeks to build. Now, I know some of you may be wondering why it took so long. Well, it's because this project has been more of an adventure than a project.
 
To start with, a friend from one of my wood working groups sent me two pieces of wood, what you see in the above photo. On the left is lacewood, and the other is birdseye maple. Well, I don't get the opportunity to work with such beautiful wood very often. So, when I do, I try to make something special with it. With this wood, I decided to make my wife a bedside lamp.
 
I went through several design ideas in my head. I finally settled on a hexagon body shape. In order to do this, I was going to have to resaw the pieces into much thinner layers in order to have enough wood. That, while working with wood you can't just run out and buy more of if you mess up, is an uncomfortable position to be in itself.
To add to this anxiety though, I was doing this on a saw that I built myself. Some of you may remember the sixteen inch monster I built earlier this year. I have to admit though, if the anxiety level of this scenario seems daunting, it makes the delight of successfully doing it on a saw I built with my own two hands even more rewarding.
 
So anyway, all went well with the resawing and I built the hexagon shaped lamp body out of sapelle with lacewood panels. So far, things were looking good. Then it came time to add the top to the body. Nothing I could pull up out of my shop looked good. The straight across grain of it all took away and ruined, in my opinion, the hard work I'd put into the sides.
It became time to move out of my comfort zone again. I hate angles. There, I said it and got it out of the way quickly. I hate angles. To do what I wanted to do with this top though, I was going to need twelve pieces of sapelle with sixty degree angles on them.
This is the first time I've really put my Incra sled to the test. I acquired this gem in a trade about a year ago. It's been a good sled. I now know though, that it really shines when it comes to awkward angles.
Here is the top I made for the lamp body. This, to me, looked a lot better than the straight across grain I contemplated before trying this. This is exactly why I love wood work. No matter how long you do this, or what you create, there's always more to learn.
 
So here is the finished lamp.
The lamp itself is sapelle, with lacewood panels. The lamp shade is sycamore with birdseye maple panels.
After all this work, and because it was for my wife, I wanted a super nice finish. So I started with three coats of Watco Danish Oil. On top of that is three coats of Minwax gloss polyurethane. Then I finished it off with Johnson's Paste Wax and a thorough buffing.
 

I guess the only thing I can add to that is to show it lit up.


I'm Not A Collector

I have gotten on this hand plane kick over the last year. In the past, I didn't even like the things. It was always too hard on my back to use them. Once I acquired a decent set of oil stones and learned how to properly sharpen them and tune them up, it became a pleasure to use them. Don't get me wrong, I still believe in the Tim "The Tool Man" way of doing things when possible, but from time to time, it is relaxing to me to save a few electrons and use hand tools.
 
Anyway, I have been setting these on a shelf in my shop as I get them. I never intended to have more than one or two. I keep finding deals I just can't pass up though. For instance, I recently bought a #4 Stanley from the early 1950s for a grand total of one buck. It amazes me. Some people practically give these away because, as I've learned, a lot of other people buy them cheap just to hang on a wall and "collect" them. Well, my friends, I would wouldn't say I'd ever go strictly hand tools, but I will say this. I am not a collector, I am a user.
 
Last week, I started to realize a small problem. I had filled up that small shelf that I had started setting my planes on, and was half way through filling up another one. It was time to take action before this usable collection gets out of hand.
So I found it was time to take one end of my middle work bench, which I use for tool storage mostly, and build a plane till. All the center dividers are only screwed down. This allows me to move things around at a later date if I happen across anymore deals I can't pass up on new hand tools.

Saturday, September 15, 2012

Rocking Cradle With Canopy

I've made this cradle a couple of times before. It was time to make it again though when I found out a family member was in need of one for child that is expected to make a debut soon. It is made of cottonwood. I used a beeswax finish on this one.
It is a fairly simple construction. My favorite part of the whole project though is the inlaid canopy top. In my opinion, it just makes or breaks the whole cradle. The rocker assembly can be removed from the rest of the cradle if the child is still using it when it gets old enough to be capable of climbing the sides, presenting a dangerous tipping hazard.

Sunday, September 2, 2012

"Footprints" Plaque

It may not look like too awfully much, but this has been a challenging piece. The text is much longer than the plaques I've done in the past. Each line of text has to be individually cut, then carefully glued into place.
The backer board is made of cottonwood, but stained with Minwax Dark Walnut stain. The border and lettering is plain cottonwood. The oval overlay pieces are walnut. Then the whole thing is finished with Minwax Clear Brushing Lacquer.
This one is two foot wide and three feet tall. It is quite an impressive piece once it's hung on the wall. From across the room is even looks massive.
This is another design from the Berry Basket Collection. I like plans from that site because they're instantly downloadable instead of having to wait for them to come in the mail. You can go here is you've got the patience to cut one yourself.