Find Select Projects Easier

If you're looking for a specific project that I've done, please click here for a categorized list page.

Don't Forget To Leave A Comment

If an article interests you, please click below it where it tells the number of comments and leave one. I appreciate all input.

Get My Blog In Your Email

Enter your email address:

Delivered by FeedBurner

Tuesday, January 28, 2014

Making Tools - Part 2

Today is a continuation of making the Oland tools. If you read yesterday's blog, I was ready to drill and tap holes for set screws today.
My first order of business though was going to be to run to town to pick up some set screws. I usually keep quarter inch set screws in the shop. It is an often used size and you never know when you'll need a spare. They strip out. They fall out and get lost. I find myself needing them often. I had somehow though allowed myself to get down to one, and I need three for this project.
The thing is, I try not to drive in snow unless it's an emergency. I just didn't feel that set screws was enough of an emergency to require me to get out on the roads today. I could do everything else and pick up the set screws when the weather is better.
So, to the drill press. The size drill bit and tap will depend on the size set screw you plan to use. If in doubt, talk to someone at a good hardware store if you have one in town and they can usually set you up with a hand full of set screws, a drill bit, and a tap, for less than ten bucks.
Before drilling your hole, take the time to make absolutely sure that you put a center punch dimple exactly center of your hole that the bit will go into. Try to get it centered between where the hole exits both sides of the shaft as well. If you're a tad off on that though, it will still pinch the bit in the hole and hold it fast. Centering it over the hole though is important so the tap will go through without binding against one side of the hole or the other.
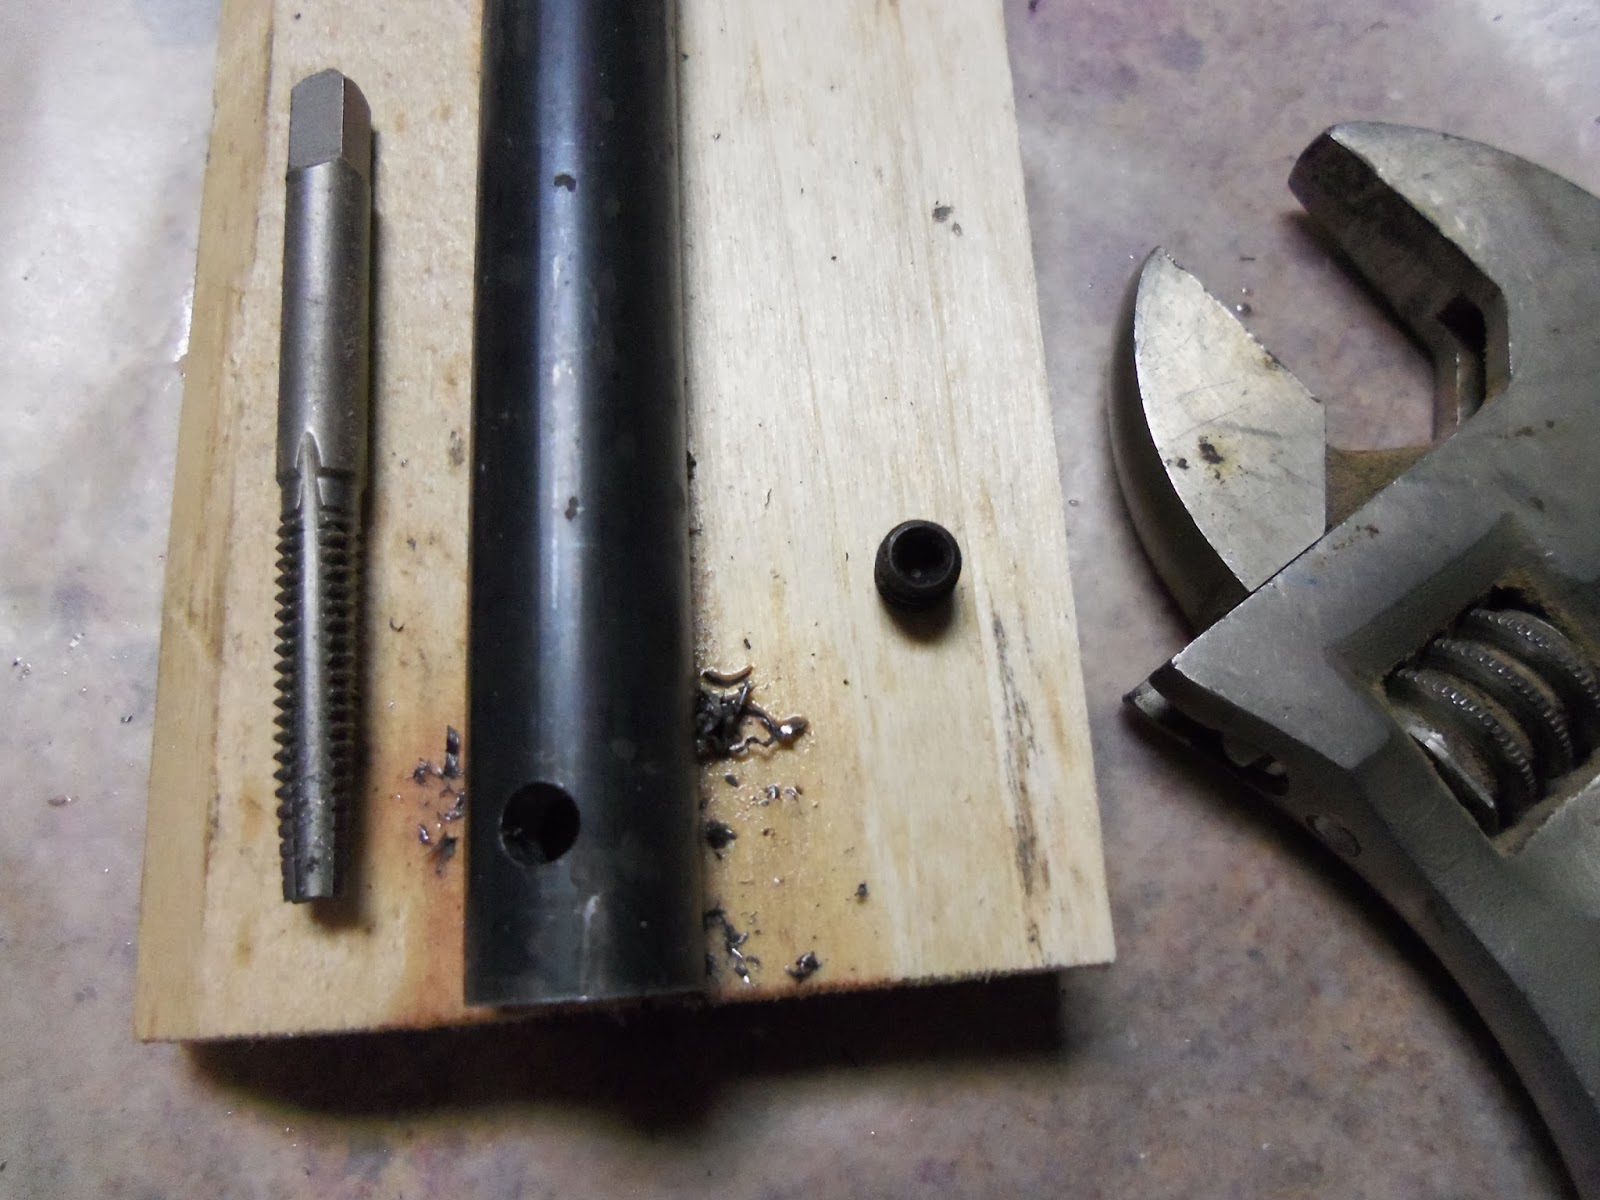
Here is my only set screw, until I can get to town, the tap to make the threads for the set screw, and an adjustable wrench to turn the tap with.
The reason I show this photo is to tell you that there is a tool made specifically for holding and turning taps. I had that tool once upon a time. It is somehow lost in my shop though like so many other things. If you are careful though, you can do the same job with an adjustable wrench.
I find the most important things about tapping threads in a hole are to make sure the tap goes in straight, keep the threads of the tap lubricated, and be sure to back out often to clean the metal off the threads.
The straight tool is good for general hollowing of bowls and other vessels. I have also used it a few times, just to see how well it worked for it, on spindle turnings.
The ninety degree tool is good at getting at the sidewalls of bowls and hollow vessels.
Now here I need to talk about the forty five degree tool. I made a change on this set of tools from the set that I have. I have two forty five degree tools. I have one like the one you see above, and one like you'll see in the next photo. I had an idea though.
I drilled and tapped the hole for the set screw all the way through on both sides of the bit hole. This allows you to use the tools as you see it above, with the bit at a forward forty five degree angle. This works great at sidewalls of bowls that are too small to use the ninety degree tool in without hitting the rim of the bowl or vessel. Also, it is ideal to cut into a sharp corner in bowls or turned boxes.
Or you can flip the tool over, put the bit in the other way and put the set screw in this side to give you a raked back forty five degree tool.
This tool is ideal for cutting upwards in a bowl or hollow vessel, especially if you're trying to put a lip on it with an undercut.
Next thing to do was to soften edges. If you notice in the photos before this one, there are sharp corners on the ends of the shafts. You can use a file, grinder, or many other options, but the edges around the business end of the tool need to be rounded off to a softer profile. If you leave the edges sharp, there is a chance of it touching wood while turning and creating a cutting action of it's own. With the softer edges, it will only rub the wood if it contacts it. It may create a burnishing effect, but that can be easily sanded out.
The next thing to do is to make bits. You can use any variety of materials to make bits. I've seen bits made from old cheap steel drill bits, nails, old files, bought cobalt and carbide shafts, and many other things. My bits of choice are made from high speed steel drill bits.
I like these Mibro brand aircraft quality drill bits. They are good steel that holds an edge a long time, and I can buy them locally for a reasonable price.
You can make bits longer or shorter. Myself, there is eight inches of round shank on these long drill bits I mentioned before. So for around six bucks I get four two inch long bits.
I just clamp the drill bit in a vise, measure, and use a hack saw to cut off the bits.
A grinder is the tool of choice to shape and sharpen these bits. Just like any high speed steel, the trick is to not let the bits get too hot to ruin the temper. The thing is, when shaping these small bits, they get hot fast. I hold them with a pair of locking pliers and keep a can of water right there. Touch the stone, dip, touch the stone, dip. Dip often and keep the bit cool.
You can follow other people's styles and see if you like them, or get some cheap bits and play around with different profiles to see what works for you. I grind all my bits on a forty five degree angle in different profiles.
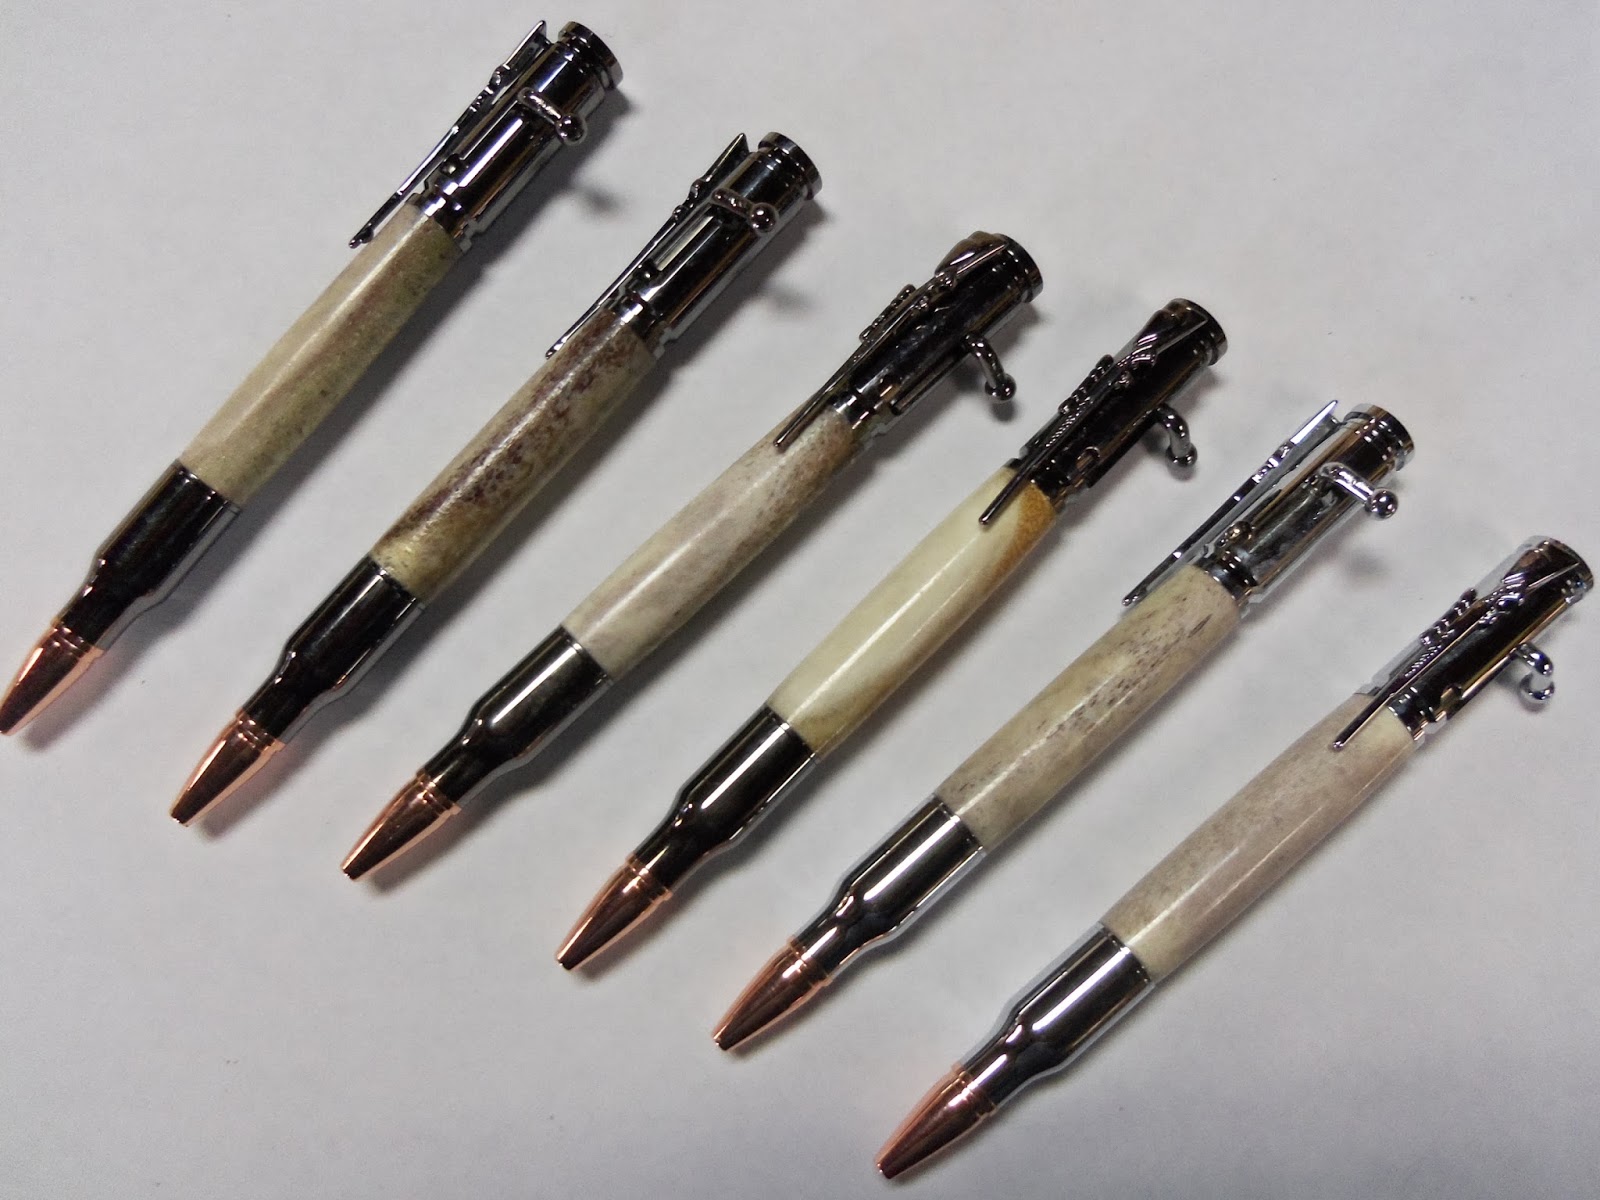
This is what I'll be shipping with the tools to my friend.
I took the privilege of grinding the four bits from the drill bit to some of my favorite profiles. If my friend doesn't like these, or has other ideas, he can easily change them. With two inch long bits, there is plenty of usable steel to regrind on. When that is used up, just buy and cut up some more drill bits, or as I was talking about earlier, use your imagination.
From left to right is:
1. Simple forty five degree grind. You do nothing but just stick the round bit to the stone and go at it till you take away enough material for an edge. This one I find good for hollowing.
2. Flat straight bit. This one is sharpened similar to the first one, except you flatten the top first. This one is good at hollowing as well, but really shines at flattening the bottom of a bowl or vessel.
3. Similar to the second one, except it has a grind at an attack angle from both sides close to forty five degrees. This one is more of a general purpose bit, but I find it works great in that transition area between the bottom and the side wall of bowls or vessels.
4. This one is a swept back forty five. When placed in the ninety or the forty five tool, it easily brings a flat edge that can comfortable be drawn straight up the side of a bowl or vessel. With practice, you can use this tool to gently trim a bowl side until it is thinner than I'm comfortable doing with a regular bowl gouge.
5. This is the allen head wrench that fits the set screws that will be in the tools.
All that's left is handles. After doing some measuring, I decided on sizes I thought my friend would find acceptable. I'm making handles eleven inches long. I need the hole for the shafts to be at or close to seven inches deep. Since the only five eighths bit I have in the whole shop that will get anywhere near that is a spade bit, that is what I'm using.
I like to clamp the bottom of the handle stock in a wooden vise to drill. This gives me something to hold to should the bit catch inside of the deep hole.
Several problems present themselves drilling this deep of a hole.
My spade bit is only five inches long. With some of that length inside the chuck, this only allows about four inches of usable length. So I have to use an extension after I go as deep as the spade bit allows.
The next problem is the three and a half to four inch of quill travel on my drill press.
To solve the quill travel problem, I have to get creative. I drill as deep as the quill allows. Then I back the bit out, raised the table until the bit is inside the hole a certain depth, then turn the motor on and go at it some more.
You can see in this photo that, by the time I get to my last pass with the drill press, the spade bit is already almost completely inside the hole before I even turn the drill press on.
The trick here is to take it slow. Also, lower the table, remove the handle blank, and dump the shavings out often. This helps prevent them from staying in the blind hole and causing the bit to eventually bind. That could cause a dangerous situation.
I know someone may already be looking at this and thinking there has to be a safer way. There probably is. I am working with what I have available though.
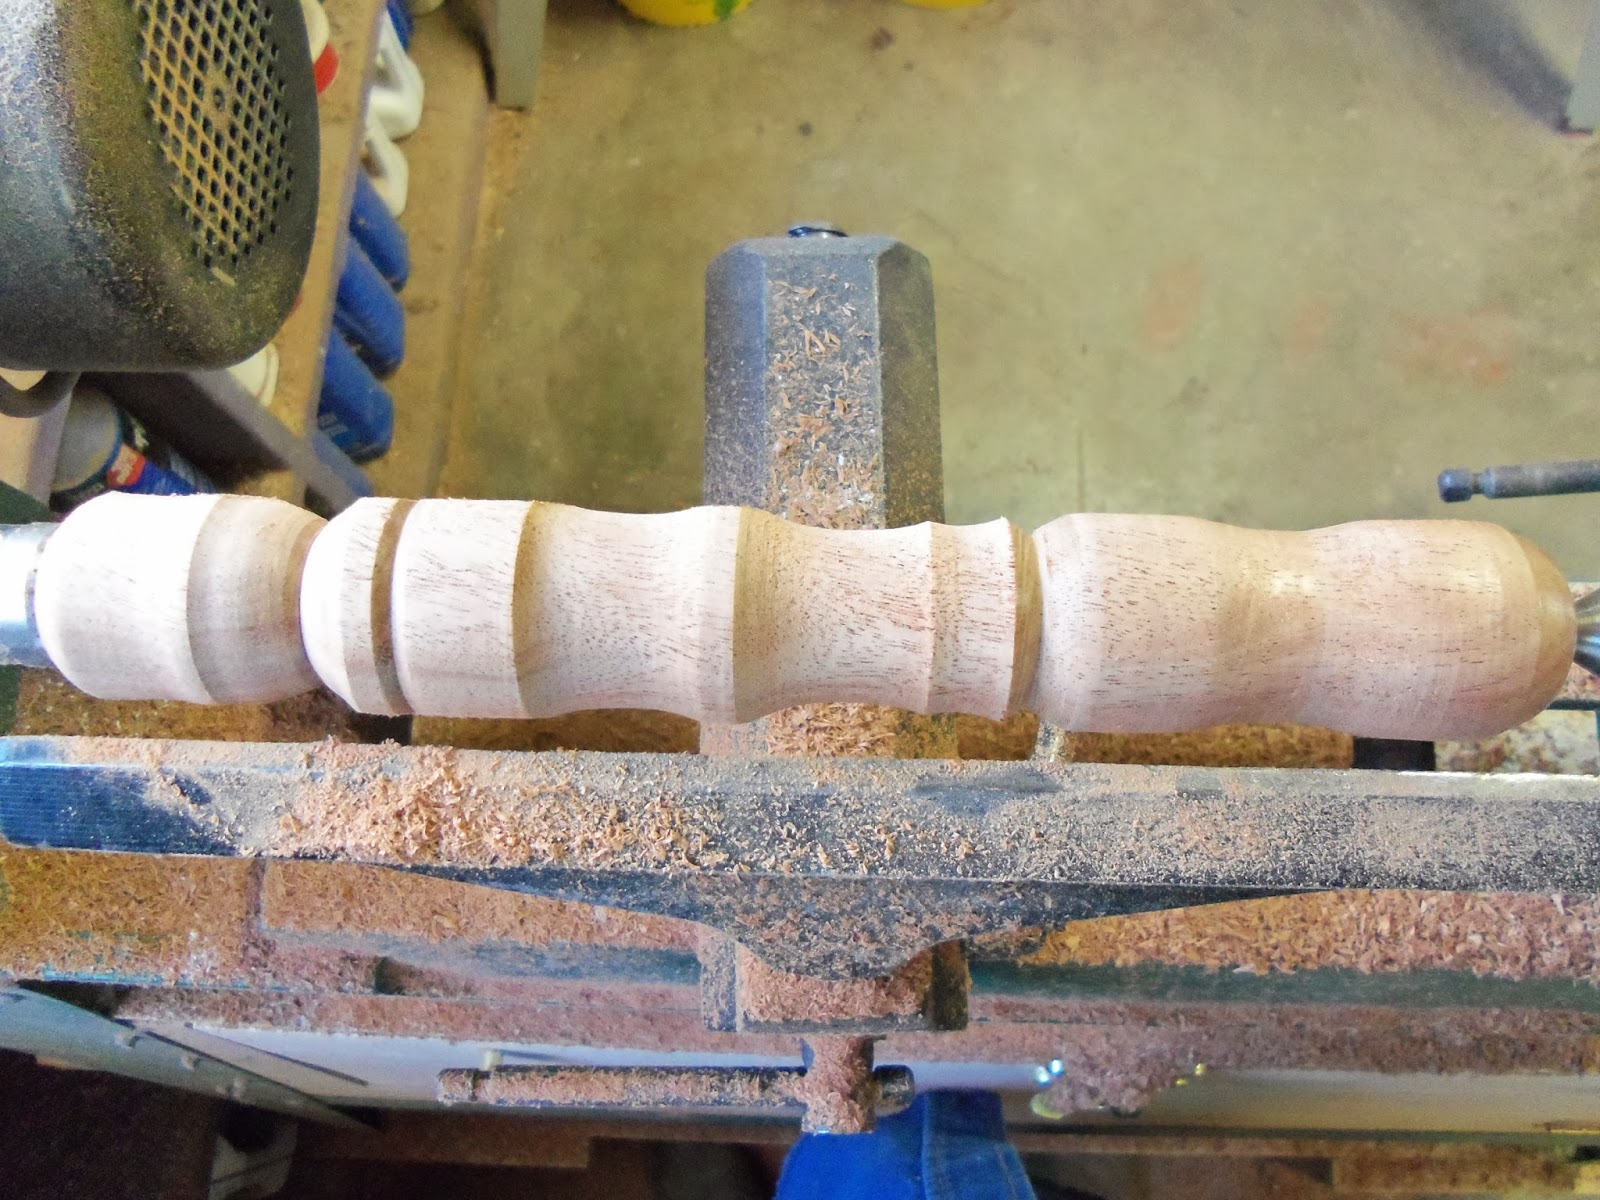
After the hole is drilled, all you do is put it on the lathe and turn your handle of choice.
I decided to not take a huge about of time on handles. This decision is mainly because I don't know if my friend is even going to like these handles enough to keep them. I know that I commonly put new handles on tools when I get them to make them more to my liking.
So for the handles, I done them quickly. I just turned them, made a few burn lines (something I do on all handles I turn) and put a coat of Johnson's Paste Wax on them.
The handle you see is a handle style I like. I do not use ferrules. I know that some say they are necessary, and there must be a reason for them, since most manufactured tools have them. However, I've never had a problem yet with my handles with no ferrules.
After making the handle, the shaft has to be inserted into it.
This is the way I attach the handle. The shaft has to be driven in with a rubber mallet. I purposely make the holes a tight fit. Most of the tools I have myself don't even have glue or epoxy in them. Either way, the shaft has to be driven in. Keep this in mind if you do it like this and use a fast setting glue.
To drive the shaft in, I put the butt of the handle on the floor, stand the shaft up in the hole, and drive it with a rubber mallet until I hear that solid lick, telling me that the shaft has bottomed out in the hole.
These handles do not have glue of any kind in them. I wanted to leave them so that if my friend does wish to make his own handles, he can easily use a chisel to break the break the handles off of the shafts and use his own handles.
If he does like them, he is also welcome to keep them on. I've only had one handle without glue ever to come loose. However, if these do come loose at any time in the future, it is easy to put some glue or epoxy in and drive the shafts back in.
So here are the three Oland tools that I plan on shipping out to my friend early next month.
UH OH!
I noticed as I was moving the tools after the last photo that something was definitely wrong with one of them. The shaft just did not seem to look right. Upon closer inspection, I found this.
Did I turn it too thin? Did I get my hole drilled crooked somehow?
Since the handle was trash anyway, there was only one way to find out.
Somehow the hole was not drilled straight. This created a scenario where it became turned too thin on one side of the handle. This in turn made the handle crack when I drove the shaft in.
So, I will have to turn another handle before I can ship them.
.
I won't bore you all with me turning one more handle. I think this two part blog showed the process of making these tools pretty well. I will be happy to answer any other questions anyone may have though.


Monday, January 27, 2014

Making Tools - Part 1

This post is about making tools. It will be several parts to it. With cold fronts moving through the area, I simply am not able to get out to the shop to do as much as I'd like.
First, this is what I've been using to insert tubes into pens that I make. It is the nozzle that comes with certain tubes, such as automotive silicone. It has worked well, but I've been wanting something better. Mostly, I just wanted something with a handle to make it easier to hold.
I seen this tool in the Penn State catalogue. If you read my blog regularly though, you know I hate buying a tool, no matter what the cost, if I can make it myself.
So I chucked a piece of half inch steel rod in my chuck on the lathe. Some time with a file, and I had a tool that seems to work well on all the tubes I had available on hand to check it on.
Then I used a piece of cocobola I had to make a nice handle for it.
Some of you may remember the Oland style tools I made a while back. Well, I have gotten a few questions in my email from time to time about them. There are several articles online that I've been directing people to. Well I was recently contacted by a far away friend who wants some of these tools but does not have a fully equipped shop in order to make them. This helps me out because I can help a friend and, since I did not take photos while making my set, can take lots of photos to be able to show people how I made mine.
So if you're interested in making some of these, follow along in the next few installments while I make a set for my friend.
First thing is to cut some steel rod to length. The length is a matter of preference. There are a couple of factors to consider. Take your favorite tool. Measure the length of the over all tool. Then measure the shaft length that sticks out of that tool. Now, through trial and error, or simply an educated guess, figure out how far into a handle you can drill a hole the proper size for your shafts. Add the shaft length to that depth, and you have your overall shaft length.
I'll need three shafts. My set is a four piece set. I have an idea though to turn the two forty five degree tools into one single tool. I will get to that in a later installment. If it works, great. If not, I'll have to cut the end off and make another one. For now though, I just need three shafts.
The shafts I cut are fourteen inches long. I may have to shorten these a bit later for my handle to make them so I know my friend will be happy. For now though, I'd rather have them long than short. I can remove some length later, but I won't be able to add any.
Let me stop right there and say this. Every step you see me do with making these tools are only the way that I do it. There are endless ways you could do the exact things I am going to do and still get the job done.
To cut the shafts to length, I simply clamp a five eighths thick cold rolled steel rod into a vise. Then I used a hacksaw and tape measure and went at it.
I'm starting with the ninety degree tool, because it is easiest to drill the hole. It simple goes through the side.
The first thing I have to do is make a jig to hold the rod. It is simply a block of wood cut on the table saw to allow the rod to lie in. They make drill press vices that would make this jig unnecessary. My drill press vise stays set up to drill pen blanks though. It is quicker to me just to cut a temporary jig.
The next thing I'll need is oil. Anytime you cut metal with a drill bit, you need oil. You can drill it without oil, but you'll burn up your bit quickly.
They actually make special cutting oils for drilling. I've used other oils though through the years. Anything that keeps the bit lubricated and cooled will work. My preference is Marvel Mystery Oil. Why? Because I've used it a lot in the past and it works.
I have an old small bottle that had 3-In-One oil in it that I keep refilling with the Marvel Oil.
The next thing I use is a center punch. I suggest always making a divit with a center punch when drilling through anything that is not flat, such as this rod. If you don't, there is a good chance your bit will "walk" when you start drilling. This can cause your bit to break.
When drilling, keep your hole filled with oil. Just back your bit out often and put a few drops down the hole. Drill slowly. Using this method, I usually wind up somehow breaking my smaller bits, like this quarter inch I'm using here, before I dull a bit.
Easy does it and you get a quarter inch hole.
There's still more to do to this, and all the shafts I'll be drilling today. I'm just trying to get my quarter inch holes done today though. The more will come later. So I'll clean the oil off of it and set this shaft aside for now.
Next up is the forty five degree tool.
This one is a little harder to drill. It is harder simply because the hole is drill at forty five degrees. The bit will have a tendency to skate down the shaft before cutting. It has to go further through the metal to make the hole all the way through. Then it has to come through the other side. This sometimes causes issues as the bit is free on one side of the cutting area while still grabbing on the other side of it.
All these issues can be overcome though.
The first thing I do is clamp the shaft in the vise. I use an angle grinder to flatten a small area at a forty five degree angle. It doesn't have to be a lot of material removed, only enough to give the bit enough flat surface to start on so it doesn't skate down the shaft. Once it starts, the hole itself will keep it going the direction it needs to go.
Then I have to get creative at the drill press in order to drill it.
Again, you can use a drill press vise for this operation if you have one. I just added forty five degree blocks under the temporary jig I made before. Then I use a C-clamp to hold the shaft to the jig so it doesn't try to slide downward as I'm drilling.
Always expect the unexpected.
Remember what I said earlier about the bit grabbing on one side and not the other as it exits the forty five degree hole? Well sometimes it may grab enough to snap the bit right off like this one did.
So I had to make a hardware store run for a new bit before continuing. I picked up three bits though. I keep extra bits around for common sizes such as this quarter inch. The one I snapped off just happened to be the last one I had on hand at the time.
.
Next up is the straight bit tool. I have been thinking about this one for several days now. The one I have is from another source. I did not make it. So I had to figure out a way to drill it. My drill press would drill it. I really did not wish though to remove my cabinet that is attached to my table that holds bits and such. It would simply be too much of a pain.
So I called a local machine shop. I figured it may just be easier for me to carry it somewhere and get them to drill a simple hole for me.
So I called them, explained what I wanted, and asked for a ball park figure on what it would cost me.
.
Forty to sixty dollars.
What!? To drill a one inch deep hole in a shaft?
Yes sir. We have to crank up a highly specialized machine to perform that operation.
Specialized machine? It's a hole.
Yes sir. It's a hole in the end of a shaft though. The only way we have to do that is a horizontal boring machine.
Ok. Well thank you anyway, but I can't afford that.
.
So I hung up the phone a little frustrated. What in the world is a horizontal boring machine? And what is so specialized about it that it costs that much to drill a hole?
So I went online to find out what this highly specialized machine called a horizontal boring machine was. Guess what I found?
It looked like a fancy metal lathe.
I don't have a horizontal boring machine, or even a not so fancy metal lathe. I do have a lathe though. I also have a drill chuck insert for my tail stock. Then I have a chuck to hold the shaft at the headstock end. I figured I could make a go of this.
The problem I ran into was that a five eighths rod will not go all the way through my headstock spindle. So I had to just chuck it into the chuck, leaving a lot overhanging the bed. This left so much unsupported weight out there that it was just too much wobble to be drilled successfully.
So do you remember the steady rests I made a while back?
What to do with too much unsupported shaft? Set the steady rest close to the chuck end. Then slide it outwards and support the rod.
Now we are cooking with grease.
Everything was going nicely. About halfway through the one inch deep hole though, I started noticing a lot of smoke from my bit every time I'd retract it to clear the shavings. So I decided it was time to take a coffee break and allow my bit to cool completely before continuing.
All went well from there and I got the hole bored, and without a horizontal boring machine.
.
I hope to run to town in the morning to pick up the set screws I forgot to get today. Then I will drill and tap holes for those.
So if you're interested, stay tuned. I will continue posting the progress as I get it done. This, I hope, will answer any questions anyone has. At the very least it will give me somewhere to direct people people when they do have questions.


Thursday, January 23, 2014

Tool Addiction

This post is supposed to be about lathe tools. I will start off a tiny bit sidetracked though, if for no other reason but to get the admission of my addiction out in the open beforehand.
I don't use them as much as I'd like to, but I do have a thing for hand planes. This is funny, since I used to poke fun at a few of my friends about their own hand plane addiction tendencies. These days, I cannot force myself to pass up a flea market booth or yard sale if my eyes a glimpse of rusty gold. I have a few, and am always looking for good deals, or simply one I don't already have. I do wish to point out though, I do not buy wall hangers. If I see a plane that is so far gone that it cannot be brought back to working order, or I can't get it cheap enough to make it valuable in parts, then I leave it where it lies.
I am a man who once said he hated hand planes. Now, although I mostly work on the lathe these days, some of you may remember from some time back that I do work on things not related to turning. All that being said, although I don't claim to be a strictly hand tool kind of guy, I do find a certain relaxation, an almost zen like appeal, to turning off the electron killers from time to time and simply listening to the whisping noise that a well tuned plane makes as it does its work on a piece of wood.
Here is my latest acquisition. My son brought it too me this past Saturday. It is an old number eight, or so I am told. I have not had time yet to break it down to do any research on it or sharpen it. Just the way I received it though, it created a six foot long paper thin ribbon as wide as the blade on a scrap piece of cottonwood. I look forward to seeing what it can do once I get time to give it a little tender loving care.
Speaking of sharpening, I gave up on the stone racks I made to clamp in vices and finally just screwed them to the edge of one of my benches. This will eliminate the time it usually takes me to set everything up just so I can begin sharpening tools. I came to this decision one day while I thought about the time it was going to take me to set them up for sharpening my skew chisel for my lathe. Most lathe tools are sharpened on a grinder. There are a few though, like the skew, that I like to put a fine polished edge on.
The need for these will also be explained a little later in a tool review.
Now back to the lathe.
Did I say I had a tool addiction? Nah! I did actually need some new tools for the lathe.
I consider myself still a beginner at the lathe, but I am always learning more. In that learning process, I have worn away quite a bit of material from my gouges while learning to properly sharpen them, and while finding that perfect bevel angle for my liking. It was getting to a point that I was choking the jig up mighty close to the handle while sharpening, so it was time for some replacements of my most used spindle gouges.
The first two tools to the left are replacements for my old Craftsman half inch and three eighths spindle gouges. I bought the Benjamin's Best gouges from Penn State. I sharpened them up and took them for a test drive. I am quite happy that they will perform fine for me. Time will tell, but I may even venture to say that they are better than my old Craftsmans.
If you need links, here is the half inch, and here is the three eighths.
.
The third tool is a quarter inch gouge from Hurricane tools. I have been thinking of getting a quarter inch gouge for some time My old Craftsman set came with the two gouges I mentioned earlier, and a three quarter inch. The thing is, the largest of the set mostly collects dust, while I often find myself wishing I had something smaller than the smallest of the set. So a quarter inch model was the obvious next step.
Since the quarter inch gouge at Penn State has been out of stock for some time, I decided to look elsewhere to find one. I ordered the Hurricane here from Amazon.
.
The fourth tool is a quarter inch bowl gouge. I have had the same issue discussed earlier with bowls, I wanted a smaller gouge. So I figured that, while I was ordering tools, I may as well let it get out of hand and go for the bowl gouge as well.
Again, the quarter inch bowl gouge at Penn State was out of stock, so I ordered the this Crown brand from Amazon.
The next three tools are Versa-Chisels, which I will discuss after the next photo.
This is the three piece set of Versa-Chisels. They can be found here.
I hate to describe it as "many", but I have lost track of the times I have been asked about these, the Sorby Spindlemaster, or other similar tools. So I started doing some reading up on them. From what I read, I realized that the best opinions of these types tools were related to the Sorby brand.
I do not wish to talk bad about Sorby tools, because I have never as much as touched one of their tools. The simple fact of the matter is that I am on a tight budget and simply cannot afford their fine tools.
So I read a little deeper, trying top find out if there really was a difference between Sorby's brand and others like it. The big difference I read about was the out of the box condition of them. The Sorby brand, from what I read, comes from the box ready to be put to wood. It is sharpened and polished. To sharpen it, you only hit the top, flat edge on a diamond stone to represent a fresh cutting edge. As a matter of fact, it is suggested that you never touch the bevel on a Sorby Spindlemaster. If the bevel needs sharpened, such as if it was dropped, you are supposed to send it back to Sorby to be repaired. Other tools though, not so much.
Anyway, I went with the Penn State version called the Versa-Chisel. I bought the three piece set so I could get a good idea of the overall usefulness of the tool style.
Out of the box, with the reading and understanding of this tool that I have done, it was my opinion that the finish on the Versa-Chisel is indeed unusable. To test this theory, I tried it right out of the box. It was a scraper. That is the best way I know to describe it. I just simply could not get it to perform the way I believed this tool was supposed to.
Next, and this explains the use of my sharpening stones I showed earlier, I decided I was going to need a similar angle (thirty degrees) and polishing, like the Spindlemaster.
In the above photo, the left Versa-Chisel is how it looks out of the box. The right one is one after I spent about an hour sharpening and polishing it.
Now I must stop here and tell you, I was told that it was impossible to polish these up to a usable state. So everything I say from this point forward may be completely wrong. If you believe that to be the case, please recognize this as my own opinion and stop reading now. While I am not saying my now doctored tools is as good or even comparable to the more expensive Sorby brand tool, I am saying that I believe some time working the edge has brought it to a point that I can honestly give my opinion of the usefulness of this style tool, and that is all I am really trying to do here.
So after spending several hours working the edge of the three Versa-Chisels, I put a piece of scrap wood between centers and went for a new test drive.
Here is where my opinion of this style tool gets kind of shady. Please let me explain.
This tool has been explained to me many times as a tool that magically gives some people the power to no longer have the need to learn to use an actual skew chisel. So let me start there and give you my opinion of a skew chisel.
The skew chisel, in my opinion and the opinion of just about every piece of literature I've ever read on the subject, is the hardest of the lathe tools to learn. The one and only trick to it is practice, practice, practice, and then when you think you have, practice some more. It is an essential tool at my lathe, but one that will only you will only learn the usefulness of when you learn to use it properly. Until you learn to use it properly, it will aggravate you. I like a challenge though. I went through a phase where I decided I did not need a skew. Then one day I made up my mind that a tool was not going to beat me, and set my mind to learning it. I suggest anyone who wants to turn much to do the same.
Now, back to the tool review.
The Versa-Chisel is advertised to perform as a chisel, a gouge, and a scraper, all in one tool. While it does do all of that, it does none of them (again, in my opinion) as well as an actual chisel, gouge or scraper. Yes, it is a good tool to have in your arsenal of options to do projects with. I do not ever though see it replacing my favorite gouge, scraper, or especially, my skew chisel.
If you are interested in this type tool, I absolutely think they are worth buying. It is an interesting concept. You could, if you wish, grab one tool and make whatever spindle turning you wish with that one tool. That is where it gets grey for me. While I think it is a great tool, I do not think it is as great or magical as I have been told. I still do not see myself ever doing anything with just this one tool. If I want rough and quick rounding, I'll get my gouge. If I want to gently scrap off a tiny amount of a surface, I'll grab my scraper. If I want a fine cut, I'll grab my freshly sharpened skew.
Now, about that idea of this replacing the skew for people who have trouble with the skew. I can see where that idea comes from. It does not seem to grab quite as badly or as quickly as a skew would if you roll it too much one way or the other. However, to get a good clean cut, I needed to execute my technique just as I would a skew. If anyone can get a clean cut with a Versa-Chisel, then I believe they are well on their way to knowing how to use a skew.
.
So, in reviewing my long winded rambling way of telling things, my review of the Versa-Chisels are mixed. It is a good tool to have. I would absolutely recommend it to some people, especially beginners who don't have a wide variety of tools or experience with those tools. Would I say it is a replacement for other tools and proper techniques? I don't think there is a such thing as replacement for proper tools and techniques.
.
Until next time my friends, happy turning!!!

Flying Pens

I don't have  nearly as many readers of my ramblings as I would like, but I do think I have some of the best readers in the world. I received an email a couple of days ago reminding me that I haven't posted anything in a few weeks. So I decided that the first thing I had to place on the agenda today was to make a post or two showing that I have been active at something.
I've had a lot going on, both in wood working, and personally. Between all that, I have turned a few pens. The problem with that is that some of them have been flying out the door before I can get a chance to snap photos of them. So let me show you the ones I do have photos of.
I had not planned on doing anything in deer antler after Christmas for a while. However, immediately after making that statement, several people started asking about when I'd be making more deer antler pens. Well, as I heard someone say once, sometimes we do the things we don't want to do, in order to be able to do the things we don't want to do. So, since some people are still wanting deer antler, I got busy turning deer antler.
These six bolt action pens are about half of what I turned. The rest seemed to just disappear off the table before I could make boxes for them, or snap photos.
I had two fifty caliber kits left and decided to do those in antler too. I had several short cutoffs of antler left that were perfect sized for these pens, but not much else. So the popularity of the antler created a means for not allowing those pieces to go to waste.
If any of you remember the story behind the enormous over and shotgun pen I done a while back in deer antler, the one I was told couldn't be done? Well I done two more of them. I made these just to see if I could, or if that first one was just a lucky shot.
These are Compson click pens. They are actually two of a six piece starter package from Penn State. These are the only two I got photos of before they disappeared though. So I guess I need to order more of these when I can.
These two are done in zebra wood cut at a forty five degree angle, and walnut burl.
Here are the last two of the credit card stylus pens I had left two make. These also seem to be popular pens. These are done in cherry burl and oak burl.
I made three more of the buffalo pencils. I liked the ones I've made of these before in burls, so I wanted to go with that. The fact that I love burl so much helped with that decision a tad as well I believe.
These are done in cherry burl, oak burl, and buckeye burl.
.
That's what I have to show you in pens. I had a few real nice ones that I wish I had taken photos of before they left. I guess I need to start keeping the camera closer so I can be sure to do that.
.
I also want to thank all my readers. The emails and messages I get from you all keep me motivated to keep going.
Remember, any of you can always leave a comment below or contact me at wdwoodworks@yahoo.com 
Since I finally moved into the modern world and got a smart phone, I check my emails daily.