Find Select Projects Easier

If you're looking for a specific project that I've done, please click here for a categorized list page.

Don't Forget To Leave A Comment

If an article interests you, please click below it where it tells the number of comments and leave one. I appreciate all input.

Get My Blog In Your Email

Enter your email address:

Delivered by FeedBurner

Tuesday, July 24, 2012

Beware Of Monkeys

I had a short day today. I think I got too hot yesterday and just couldn't do much today. It is hot here in Mississippi. All of you in hot climates, be careful. I passed out in the shop last year. I'm trying to avoid that this year by drinking extra fluids, smart placement of my fans, and taking it easy when I need to.
This sign, as soon as I seen the pattern for it, made me think of my kids. So I stuck it back just for  quick and easy project on a day like today. I downloaded the pattern from Steve Goode's website, Scrollsaw Workshop.

Monday, July 23, 2012

The Birmingham Clock

I enjoy building clocks very much. This is the first one I've done in a long while, and as usual, I thoroughly enjoyed it. It is made of cottonwood and mahogany and finished with shellac. It's hard to tell from the photos, but this wall hanging clock is sixteen inches wide and thirty seven inches tall. That is large for a wall hanger.
The plans for this one came from the Berry Basket Collection. You can purchase the plans here if you'd like to build it yourself. The name of the clock is The Birmingham Clock. According to the plans, it is supposed to have a clock insert in it. However, I always like to use simple clock movements and design my own wooden faces, as I done on this one.

Saturday, July 14, 2012

Don't Like Cops?

Ok, so I was having a terrible day. I'm talking about one of those days that every step felt like some kind of cruel torture. I had to get to the shop and do something though. So I needed something I could do sitting in my chair.
I remembered this pattern I had downloaded from Steve Goode's website, Scrollsaw Workshop, a  long time ago. I used Inkscape to enlarge it to fourteen by seventeen inches and cut the letters into the wood using a palm router.
I think this one is just hilarious. Go look through Steve's pattern catalog. You'll find all kinds of great patterns. If you can afford it, I always ask people to donate to his site if you like and use his patterns. He keeps that site going with extremely informative videos and free patterns. He does it all in his on time and on his own dime.

Pagoda Towers

Until a couple of days ago, I had never heard of the game, pagoda towers. A lady contacted me on Facebook about making this for her. Her grandfather used to play this game with her and she'd been looking for one for a while. So I made it for her.
The stand is made out of pecan, while the blocks are made of oak. It is finished with Johnson's Paste Wax. I made this out of pieces out of my scrap bin.
The object of the game is to move the pieces, as you see them in the photo, to a different peg. When you are done, they have to be just like you see them, stacked with the largest piece on bottom, moving up to the smallest. You can use any of the pegs to move the pieces one at a time. The catch is that you can never have a piece above a piece smaller than itself. Yes, that make it a little harder than some of you were thinking, doesn't it?

Wednesday, July 11, 2012

Kentucky Stick Chair

This is something I have found out has been around forever, but I have only recently come across. A friend of mine that lives over in Louisiana told me about them and directed to the plans. The plans can be seen for free at the BuildEasy website, or a PDF version can be bought for five dollars. I suggested the bought plans because they are in an easier format to print and carry to the shop with you.
These are not hard to build. They only consist of three two by fours ripped into sticks and various hardware to hold them together. Once assembled, they are extremely strong, but also comfortable.
 Another great feature of these chairs is that they fold up for easy carrying and storage. I have made two of them now. One I made out of simple yellow pine and treated with Thompson's Waterseal. The other I made out of pressure treated pine. The untreated ones are quite light. The pressure treated ones do have some weight to them and may be a little on the heavy side for beach goers.

Sunday, July 8, 2012

Truck Mailbox

Ever since I made a custom mailbox for our house, I'd been wanting to make a couple of different designs for sale. This is my first attempt at it. It is simply a standard mailbox with wood attached to it and painted to look like a truck.
This was one of my favorite type of projects. What I mean by that is the plans I used. I used none. I simply drew straight onto the wood I was going to cut and sort of made it up as I went along. I enjoy working that way sometimes.
I hope to do some other designs in the future. I'll have to wait and see if this one sells, or even gets any interest for that matter.

Friday, June 22, 2012

Wishing Well Planters

These flower planters look like wishing wells and stand close to four foot tall. To give you an idea of the other dimensions, the roof panels are twenty four inches long. I made these out of cottonwood and sealed them with Thompson's Waterseal. I plan on doing some more at a later date out of some better weather resistant wood, but this is all I had at the moment and could not afford buying cedar or cypress as I wanted.
The patterns come from the Berry Basket Collection. You can purchase them here. They are easy to follow patterns. You simply print them out, tape together parts that are larger than the paper using the easy to follow pattern lines and then go to work. I especially like patterns from this site because they are instantly downloadable. I hate ordering patterns and then waiting a week or more for them to arrive in the mail. I'm an inpatient man in that regard.
In the downloadable plans, you get the pattern for the tulip and the heart style side pieces. You also get a pattern to make a bucket to hang on the movable crank rod, but I opted to hang flower baskets there instead.
This is not a hard project to do. I completed both of these planters in three days. I cut all the parts on a scroll saw. I believe all of it could also be cut on a band saw though. I just prefer the scroll saw.

Monday, June 11, 2012

They Don't Make Them Like That Anymore

I love old tools. As a matter of fact, the older they are, the more they draw my interest. What I don't like it old wall hangers. These old tools, in my opinion, were made to be used. Usually, if I wind up with an old tool that cannot be made usable again, I can find someone who wants it. In order for me to keep it though, I have to be able to restore it to a usable condition.
So this is the state of disrepair of my latest find. This is an old Craftsman saw that, as far as I can find at this time through my limited research skills, was made maybe as far back as the forties. I do know that, based on the styling, it was one that was made for Craftsman by Walker Turner. It was a very interesting find for me and it seemed to be in a condition that could very well be made to run again.
One of the things I love about tools from this era is the fact that they're completely rebuildable. I was able to tear the saw all the way down to the bare frame. I cleaned it up and sprayed a fresh coat of paint on it.
The most interesting part of this particular saw to me was the gear box. The side cover leaked. So when I removed it, I found out it still had the, probably original, leather gasket on it. The inside of the gearbox, which I found almost impossible to get good photos of with my camera, works almost like a miniature cam shaft, with offset lobes that push the drive shaft up and down. On the side of the vertical shaft is a little cup that acts as an oil slinger. Each time it dips down into the fifty weight oil, it brings up a little bit of it and slings it all over everything, keeping things lubricated and running smoothly.
I tore the dust boot on top while trying to clean it and had to sew up a new one. The original was made out of some very thick denim. I didn't have anything that thick, but an old pair of jeans loaned some similar material to get it back on track again.
The only major part that was missing when I got the saw was a motor. I used the smallest motor I had around, which was a Craftsman half horse motor.
I painted the raised letters on the side white, just to make them stand out more. This saw has a twenty four inch throat. It will use blades from five to seven inches by adjusting the plunger assembly in the head unit. While playing around with it, I found it easily cuts wood three inches thick, something no modern scroll saw even claims to do. I think I'll be putting this old iron into service doing a lot of work. So far, it seems to be a real pleasure to use.


Monday, June 4, 2012

Unicorn Mailbox

This mailbox idea started out with just an idea to route a sign with a name and address on each side of a post. After doing so though, and standing back to take a look at my work, it simply didn't look good. I think I did a good job on the sign, but now the mailbox looked too plain.
So next I started bouncing around some ideas for making the mailbox more interesting. I thought about making the mailbox itself as part of a truck. I looked at the shape of the mailbox and thought it would make an interesting hood, with the front grill opening up as a mailbox.
The lady of the house has to be happy though, and she likes unicorns. So, my truck idea was put away for a later date and I started on this unicorn themed mailbox.
The external box and unicorn head is made of cottonwood. The mane is made of pine and mahogany. The eyes and nose are made of mahogany and Walnut. The base that the head sits on is oak. Then everything was finished with five coats of Hellsman Spar Urethane, which should protect it from the elements for a long time to come.

My original idea while getting started on this was to simply make the box out of wood with a wooden door. However, I thought about it and gave a call to my friendly local post office. They informed me that, although there are no rules about how to decorate my mailbox, the box itself did in fact have to be a postmaster approved box. So I made the wooden box that encases the regulation one.
Then I needed to do something about the flag.

So I built the box with a slot where the flag raises up and down. This way, it works as it's supposed to without interfering with anything else.
Do not fret though, I didn't forget about my truck idea for a mailbox. I found mailboxes cheap at WalMart. So I bought two. Soon, I hope to build a truck and a car themed mailbox and see if anyone would be interested in buying themed mailboxes.


I'm Baaaack!

Last night I sat, broken hearted, and typed up a post, which I have now happily deleted, about the end of this blog due to a non-supported operating system. I was not willing to let it go that easily though. I mean, almost everything I've done in my shop in the last few years is posted here.

So, it took some serious internet research, but I was able to get this old computer to update the way it was supposed to do. For some reason, my computer simply refused to update to newer software so that it would be compatible with this blog. I found out it was possible though to manually download everything and get it updated. So I am happily back to banging away at the keyboard for my blog. I hope to present you all with many projects in the future.

Actually, the next one is coming in a few minutes.

Friday, May 11, 2012

Here's Your Sign

I have wanted for some time now to make some wooden signs, starting with a sign for my shop.


I checked into the router template methods, like the Milescraft Sign Pro, but none of them offered letters that I felt were large enough for outside signs that are meant to be seen from the street.

I built a pantograph with the intention of making templates to create signs. The pantograph works great, but as I started trying to gather everything I needed to make the templates for them, I came to the realization that, holy crap, that’s a lot of templates if you want various letter size and styles.

So I sat down online doing some reading up on how other’s create these large signs successfully. For the most part, what I learned was that most people at least claimed to draw out their letters and route them freehand. I thought there was no way. Now, I at the time was thinking of my large Ridgid two horse router that I have felt numerous times what happens with that kind of size and power if you hit a knot or grain change while not using a guide or template. So I really couldn’t see how doing these sign freehand could work safely.

Then I decided to back up to square one and reconsider something that had not occurred to me. The large two horse router is meant to have that kind of torque and power. However, the palm router that I’d gotten for the pantograph was meant to be used in your hands smoothly. Maybe it would run smoothly enough to do these signs by hand. What did I have to lose?
 
If any of you have a palm router and have thought of making some signs. Draw out some letters and give it a try. It’s much easier than you may think it is.

Wednesday, May 9, 2012

Keepsake Boxes - Graduation Gifts

This is one of those simple projects that turned into an interesting journey.
I started out with the idea of making my daughter a very simple, plain keepsake box for a graduation gift. As usual though, nothing that starts out simple for me stays simple very long.
First I got the idea to make her best friend one just like hers, so it then turned into two boxes instead of one.
After that, it sort if evolved into making stacking boxes instead of just a plain box.
Then I thought of adding their school initials and graduation year as scrollwork on the side of the boxes. Somehow though, that changed into making those out of three quarter inch stock and making that the handles for the top boxes.
After that, I still wanted something to break up the look of the sides so I scrolled their initials and placed that on the sides. This seemed like a good idea because these two girls are planning on sharing a college dorm room in the fall. So having their initials on them will help them know which belongs to who without having to open them first to look at the contents.
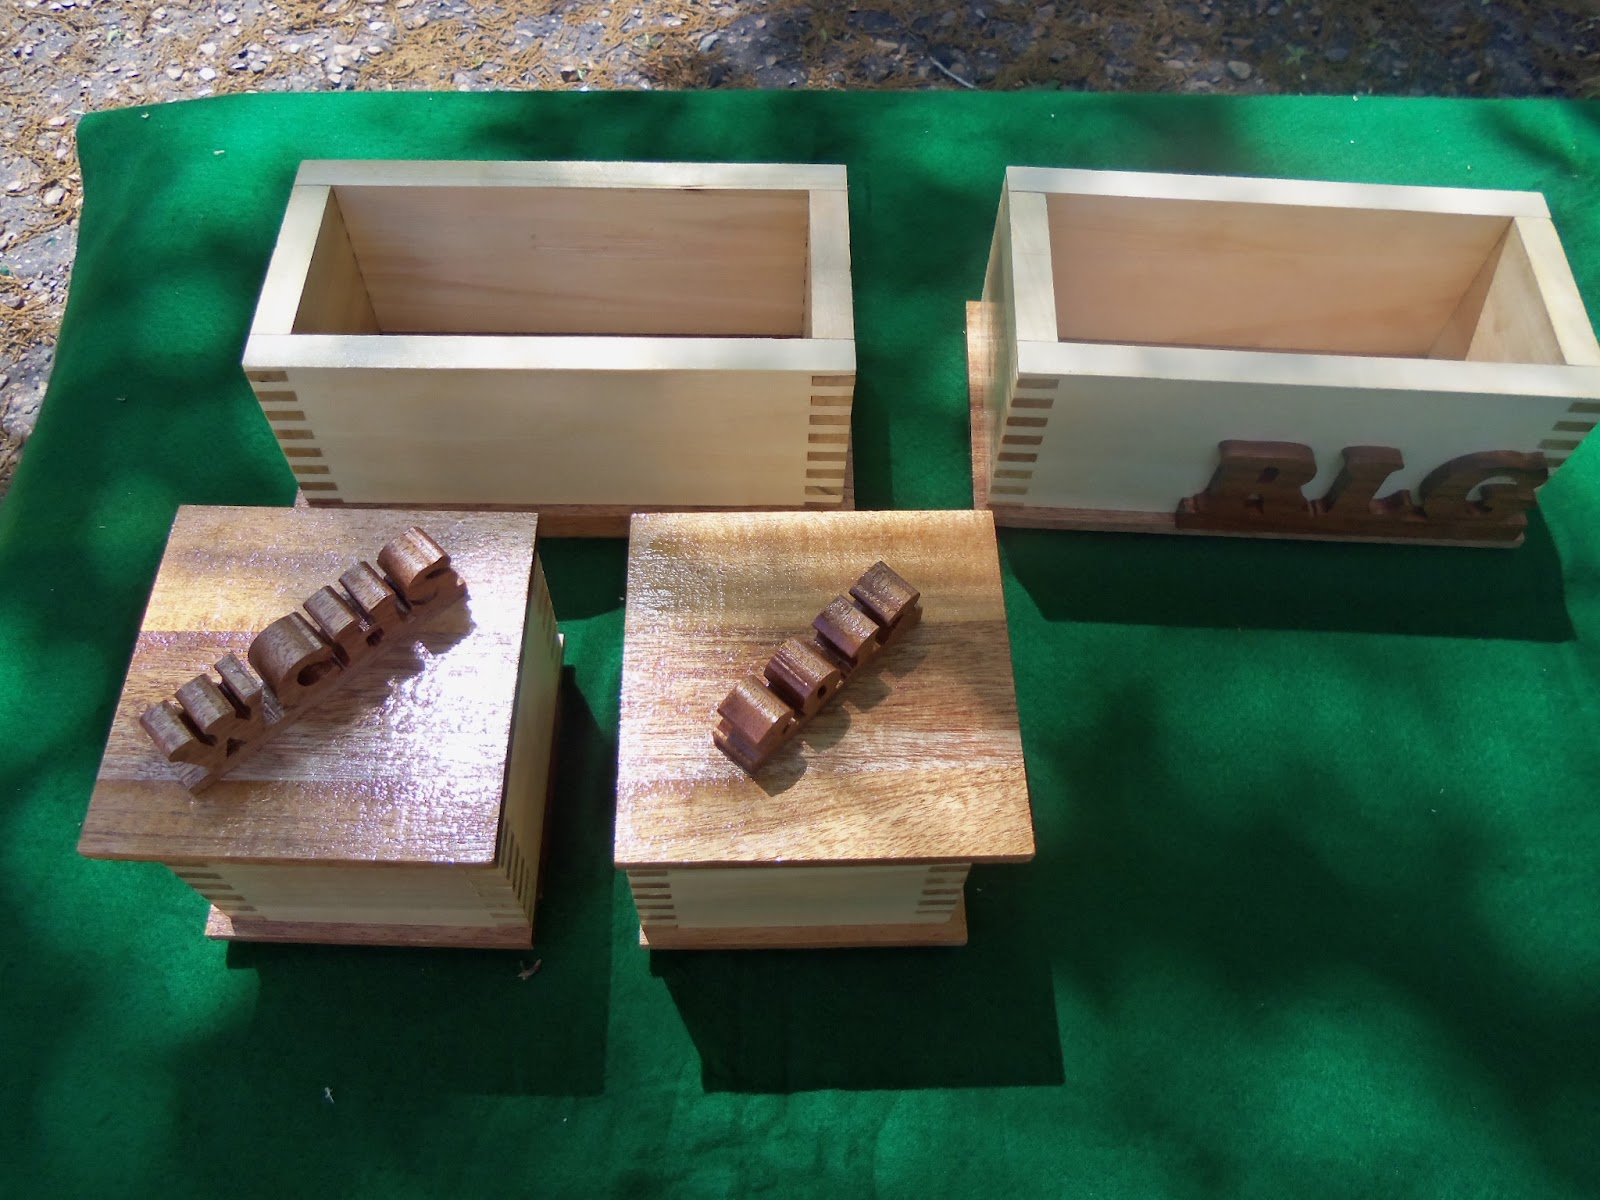
The light colored wood is cottonwood and the dark wood is mahogany. It is finished with three layers of Minwax polyurethane.
I also wanted to show how the boxes break down.
You can remove the lids on the top two small boxes.
Next, you can remove the two small boxes to reveal the middle large box.
Then you can remove that box to reveal the bottom large box.
And this last photo shows how I cut the bottom of the middle box and the bottoms of the two top small boxes to sort of nestle into the boxes below them.

I swear, it baffles me sometimes how a simple project like the one I started out on here can turn into a week long project without even giving it much though. Thus is the nature of wood work I recon. It is a very interesting journey though on which one always learns something new.
I had a lot of enjoyment and sorrow while doing this project. While working on it I thought a lot about over the years of my daughter growing up and came to a realization. She has grown up way to fast for me. I would give anything in the world just to have my little princess back. If any of you have small children, cherish every day with them. They will be grown before you know it.