Find Select Projects Easier

If you're looking for a specific project that I've done, please click here for a categorized list page.

Don't Forget To Leave A Comment

If an article interests you, please click below it where it tells the number of comments and leave one. I appreciate all input.

Get My Blog In Your Email

Enter your email address:

Delivered by FeedBurner

Friday, May 11, 2012

Here's Your Sign

I have wanted for some time now to make some wooden signs, starting with a sign for my shop.


I checked into the router template methods, like the Milescraft Sign Pro, but none of them offered letters that I felt were large enough for outside signs that are meant to be seen from the street.

I built a pantograph with the intention of making templates to create signs. The pantograph works great, but as I started trying to gather everything I needed to make the templates for them, I came to the realization that, holy crap, that’s a lot of templates if you want various letter size and styles.

So I sat down online doing some reading up on how other’s create these large signs successfully. For the most part, what I learned was that most people at least claimed to draw out their letters and route them freehand. I thought there was no way. Now, I at the time was thinking of my large Ridgid two horse router that I have felt numerous times what happens with that kind of size and power if you hit a knot or grain change while not using a guide or template. So I really couldn’t see how doing these sign freehand could work safely.

Then I decided to back up to square one and reconsider something that had not occurred to me. The large two horse router is meant to have that kind of torque and power. However, the palm router that I’d gotten for the pantograph was meant to be used in your hands smoothly. Maybe it would run smoothly enough to do these signs by hand. What did I have to lose?
 
If any of you have a palm router and have thought of making some signs. Draw out some letters and give it a try. It’s much easier than you may think it is.

Wednesday, May 9, 2012

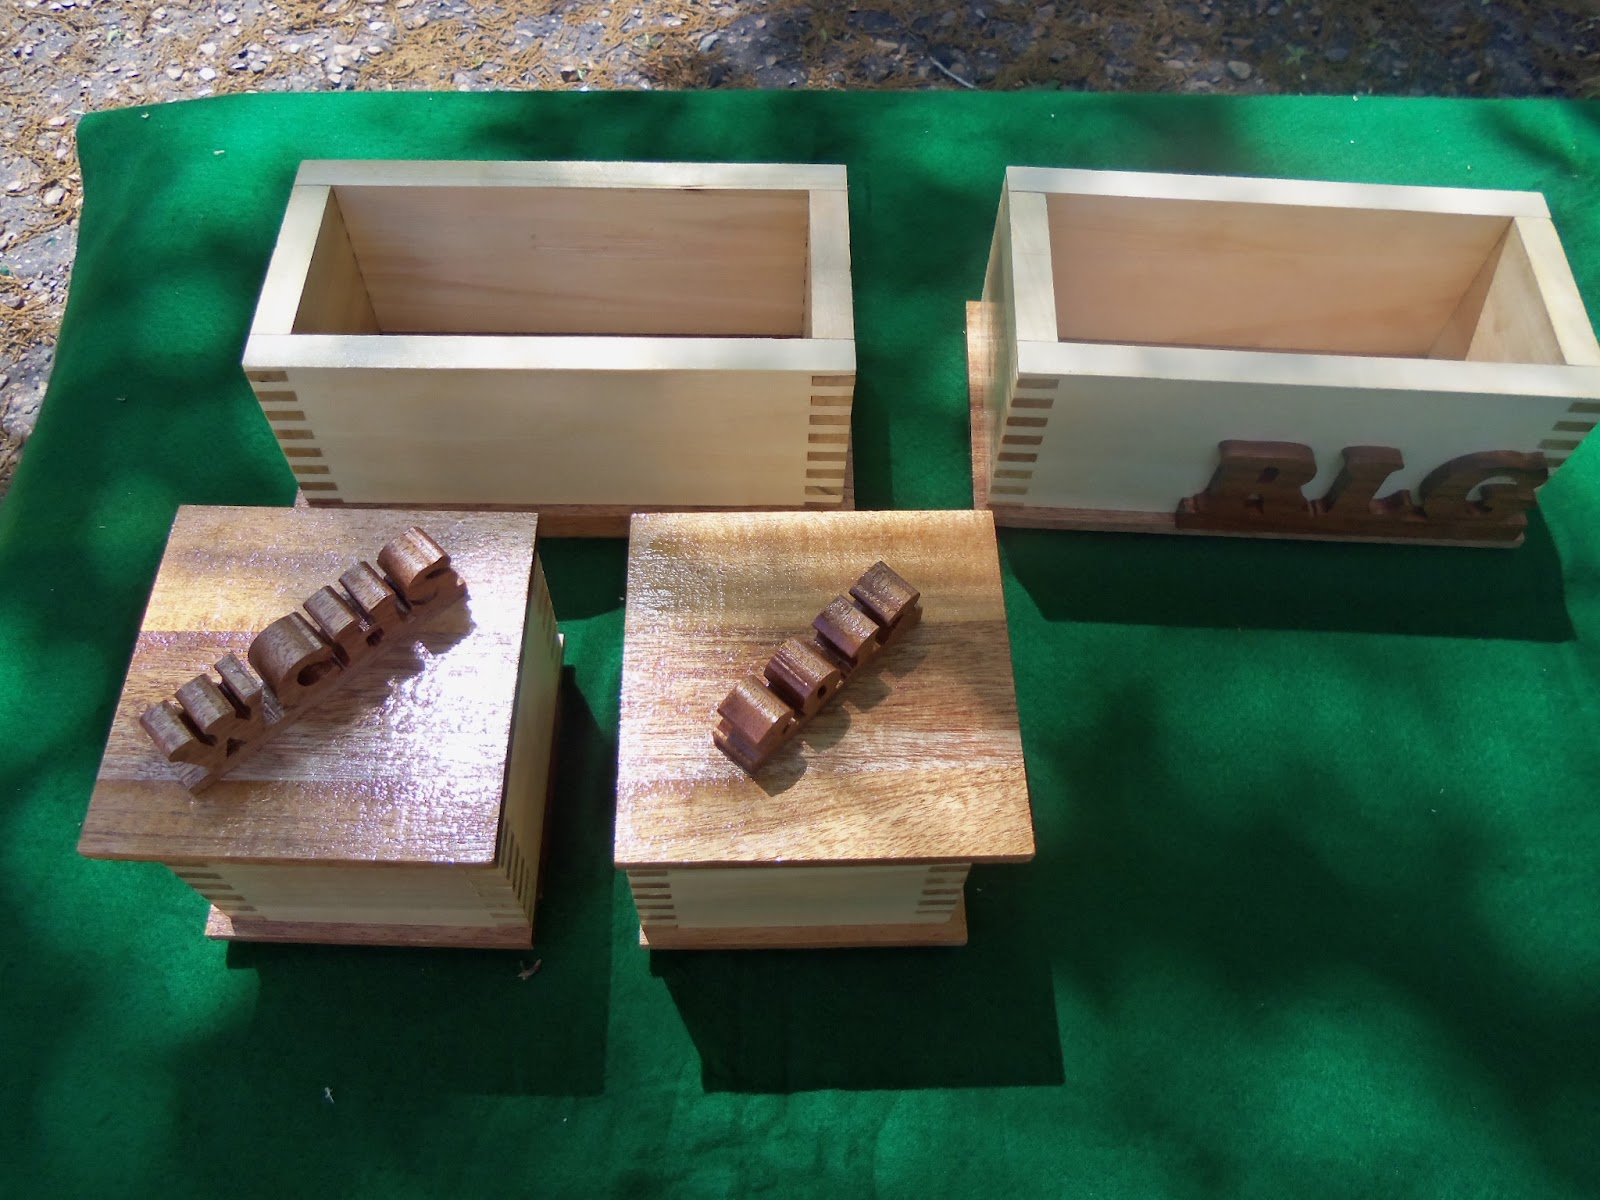
Keepsake Boxes - Graduation Gifts

This is one of those simple projects that turned into an interesting journey.
I started out with the idea of making my daughter a very simple, plain keepsake box for a graduation gift. As usual though, nothing that starts out simple for me stays simple very long.
First I got the idea to make her best friend one just like hers, so it then turned into two boxes instead of one.
After that, it sort if evolved into making stacking boxes instead of just a plain box.
Then I thought of adding their school initials and graduation year as scrollwork on the side of the boxes. Somehow though, that changed into making those out of three quarter inch stock and making that the handles for the top boxes.
After that, I still wanted something to break up the look of the sides so I scrolled their initials and placed that on the sides. This seemed like a good idea because these two girls are planning on sharing a college dorm room in the fall. So having their initials on them will help them know which belongs to who without having to open them first to look at the contents.
The light colored wood is cottonwood and the dark wood is mahogany. It is finished with three layers of Minwax polyurethane.
I also wanted to show how the boxes break down.
You can remove the lids on the top two small boxes.
Next, you can remove the two small boxes to reveal the middle large box.
Then you can remove that box to reveal the bottom large box.
And this last photo shows how I cut the bottom of the middle box and the bottoms of the two top small boxes to sort of nestle into the boxes below them.

I swear, it baffles me sometimes how a simple project like the one I started out on here can turn into a week long project without even giving it much though. Thus is the nature of wood work I recon. It is a very interesting journey though on which one always learns something new.
I had a lot of enjoyment and sorrow while doing this project. While working on it I thought a lot about over the years of my daughter growing up and came to a realization. She has grown up way to fast for me. I would give anything in the world just to have my little princess back. If any of you have small children, cherish every day with them. They will be grown before you know it.

Friday, May 4, 2012

Oak Jewelry Cabinet

Money is tight. That should be no surprise as times are tough all over. Since I can't afford my wife something nice for the upcoming Mother's day, I decided to build her something nice.
This jewelry cabinet is sixteen inches wide and two foot tall. It is made of solid oak. It is not a light cabinet at all.
All six drawers, along with all the other finger joints you see on the cabinet were made using the box joint machine I posted a while back. As you can see, the machine works beautifully.
The cabinet has six drawers riding on wooden slides. The two sides swing out to reveal ten hooks on each side to hang things such as necklaces and bracelets on. It is finished with Minwax Gloss Polyurethane.

I really enjoyed building this. While I cannot claim this as my own design, I did not work from plans. I didn't even write down any perceived measurements before I began building it. I just sort of made it up as I went along. The design cues came from various ideas I'd seen here and there.

Pantograph

This is what is called a pantograph. It is a design of Matthius Wandell. You can see his website here.
So, what does a pantograph do? I'm glad you asked.
A pantograph such as this one works by allowing movement on three different axises. The end, the piece you see at the far right of the machine, is called the follower. With the follower, you follow a pattern or template. The router that is mounted in the middle of the machine follow the follower, left, right, up, down, or wherever you go with it. Because of the full range of motion, you can cut three dimensional cutouts from pretty much anything.
This is a good example to demonstrate what I'm trying my best to describe. I followed the crescent wrench you see in the photo with the follower. The router cut that three dimension item into a blank of wood at one half the size. As you can see, as long as you have or can make a template of anything twice the size you want it cut, you can cut anything you wish in wood.
I have some ideas for this in the future. It will be fun though experimenting with it though and testing the boundaries of just what I can do with it.

Wednesday, April 18, 2012

A Shop Made Scroll Saw

I have seen many designs for home made scroll saws that were foot powered by way of pedals or a treadle, like old sewing machines. I have always wanted to build my own scroll saw ever since I got into scrolling and seen one of these designs. Because of my ongoing back problems though, I was always worried about building one. If I built it, I wouldn't be able to resist using it, and possibly hurt myself again. So when I seen this design, it was an instant must do project for me. I just had to build it as soon as I got the chance.
A while back, a good friend of mine who knows I like woodworking magazines for when I'm down, saved a huge lot of them from a dumpster with me in mind. It was in one of those magazines that I found this scroll saw design. I like these magazines because when I'm down, even if I can't do much in the shop, I'll put on a cup of coffee and look through them for future project ideas.
This scroll saw design came from the August 1986 issue of WOOD magazine.


I made this scroll saw out of all pecan wood. I chose it over oak, which is recommended in the magazine article, because of it's strength and beauty. To me, when finished with a clear finish, pecan is one of the most beautiful woods around.

All the corner joints in the saw stand has open mortise joints, which are then pinned with three quarter inch hardwood dowels. This, in addition to other interlocking joints in the design, create an amazingly strong frame for the base of this saw.

It has a twenty five inch throat and an eighteen inch wide table for plenty of work area. The plans give clear instructions on how to make your own blade holding mechanism for pinned end blades. However, I had a Craftsman aftermarket set laying around the shop that will allow me to use pinned or plain blades. So I opted to use that set instead. I also made a few other minor changes to the design, but nothing major. The design, as it's printed in the magazine, is a great design if you didn't change a thing on it.

I think the photos pretty much tell the rest of the story. It is an interesting piece. I'm not exactly throwing out my other scroll saws. This will be more or less a conversation piece and a little eye candy for anyone coming into my shop. I hope you all enjoy seeing it as much as I enjoyed building it.


Friday, April 13, 2012

A Journey In Search Of Easier Joints

I love the look of dovetail joints. While I know how to hand cut them though, people just don't want to pay the price for my work to make it worth me going through that trouble. Besides that, most average people cannot tell the difference between a hand cut and a machine cut dovetail. Now don't get me wrong. If someone wants hand cut and is willing to pay for it, I enjoy doing them. For the average person though, the fact that a joint is hand cut does not matter to them as long as the overall quality of a piece of work is up to par. So I went into some research of an easier way to make dovetail joints.
Before I done anything else, I spent two days testing the quality that is possible with a certain dovetail jig I already had. I started to post a photo and name of that jig but decided against it. I instead posted a photo of some of the test pieces I made with the jig. With some time and patience, it can be of use to some people. As picky as I am though, this jig just did not consistently provide repeatable quality that I could ever be satisfied with.

What you see in this photo is the machine I built using plans I purchased from a man known in certain wood working circles as Stumpy Nubs. This machine provides me with everything I want in a dovetail jig. It does so much in fact, that it is not called a jig, but the Dovetail Machine. This thing provides consistent repeatability, tight joints, adjustability. It has it all. A comparable, factory made machine, is extremely expensive. I wound up with around fifty bucks in the building of the Stumpy Nubs Dovetail Machine.

So what makes it so great? Notice the fingers. They slide along the track they are mounted to so that you can adjust the tails and pins of your dovetails as wide or narrow as you'd like. Also, you can even do variable spaced joints to give it more of that hand cut look. This machine also provides a means for cutting sliding dovetails. It is everything I want in a device to machine cut dovetails and more. I am extremely happy with it.

If any of you want to build this yourself, you have to wait. There is more to this story. I will provide links to more info at the end of this post though. First, read on.

And the proof is in the joint. This photo shows the first test piece from the Dovetail Machine. This was quickly whipped up out of scrap and hastily setup of my router. It is tighter than most hand cut dovetails I have done. Even without any glue on it I wouldn't be worried about using it as is. When I use this joint in projects with glue, it will give plenty of strength in addition to the good looks of it.


So after building the Dovetail Machine, my attention quickly grew to another type of joint after looking at what else Stumpy Nubs had to offer, the box joint.

I already had a way to cut box joints. I made a jig for that a long time ago using miter gauges. While it was primitive, it worked. It had it's limitations though. It was set up for three quarter inch fingers. I'd always done just that size because it was such a pain to reset the jig to do anything else. It would have been easier just to do hand cut dovetails. Well, Stumpy offered plans for a machine that offered infinite adjustability and looked like it would work well. So after I had such a good time building the Dovetail Machine, I just really wanted the Box Joint Machine as well.

The Box Joint Machine design using a lead screw system that is controlled with cranks and a handle on the left side of the machine. You can cut any width fingers on your box joints simply by counting different amounts of turns on the crank handle. It is a pleasure to use and opens up a whole new world of possibilities for me for using box joints.

The lead screw controls a carriage that you clamp your stock to that is being cut. This means no more moving my stock for each cut, which was always a pain in the butt. Every time I moved it, I had to take the time to reassure everything was straight and square before making the next cut. With this machine, you clamp your material to the carriage. Then your carriage moves when you crank the handle, while the stock stay clamped in the same place. This, in addition to the fence that keeps everything square, means I can now cut box joints in a fraction of the time it used to take me.

The machine rides in both miter slots on my table saw instead of one. This helps assure everything stays square. I really don't know how much more I can brag on this machine. I guess the best way is to show you what it can do.

This is again just a test piece in scrap wood. These are quarter inch box joints. They provide amazingly strong joints. Now let me tell you, this is the first time I've ever put this small of box joints on three quarter inch thick wood. I've just never had a way to cut box joints accurately enough to make fingers that small. I am overjoyed with this machine and am sure it'll see plenty of use in my shop.


So I recommend the plans for these machines to anyone who likes them. They are worth more than the ten dollar price tag that Stumpy Nubs gets for them. Stumpy, like me, is not trying to make a huge profit on his designs. He just wants to keep his shop running. So if you think you'll like something like this, go watch some of his videos and order some plans from him.


You can watch videos of Stumpy Nubs at Blue Collar Woodworking.

You can go straight to the Dovetail Machine video here.

You can go straight to the Box Joint Machine video here.

You can see the available Stumpy Nubs woodworking plans and purchase them at the Stumpy Nubs Store.


Saturday, March 31, 2012

My First Hand Plane

I have a few wood working buddies here in Mississippi. They are big into hand tools, especially planes. I have resisted getting into that because, quite frankly, I can't afford anymore on my hobby than what I'm already spending. Things get expensive, especially when I can't sell any of my work.
Well, this morning, I went to an estate sale. As much as I have resisted getting into this interesting part of the wood working hobby, I just couldn't pass up a plane for one dollar that seemed to be in pretty good shape.
It is a Dunlap plane. All the metal parts are in used, but excellent shape. The wood, not so great, but I am a wood worker, so I knew that was not an issue. Besides, like I said, it was one dollar. I have spent more than that on a cup of coffee. So how could I go wrong?


So I carried it home and tore it apart. Everything, after cleaning it up, was in even better shape than I had imagined. I only found three marking on it. The plastic knob above the blade iron has the word Dunlap on it. The inside of the throat area has a three stamped on it. The blade iron has the words, "Made in Germany" stamped.


The only real issue was the handles. They just simply looked like crap. I thought I could sand the paint off and refinish them. While doing so though, I also noticed some cracks. So I decided to just make some more.


Any of you reading this that collect planes may be laughing at these. I am quite happy with them though. Keep in mind, this is my first hand plane. For a first timer, I don't think these shop made handles are bad at all.


All cleaned up, I think it looks nice. Looks aren't the deciding factor here though, is it?


It works fine. I'm in a situation now. I am a power tool guy. I am also a broke power tool guy. Now though, all I can think about is all the different hand planes I would love to have that I cannot afford.


Patio Furniture


I finally got the patio furniture set out so I could snap some good photos of it.

All the metal got a coat of Rustoleum Hunter Green paint.

Then each chair has fifty oak slats. Each slat has two cleats on the back to hold them in place. That makes for two hundred slats total, and four hundred cleats.

Then all the wood is sealed with Behr Premium Waterproofer.

I am afraid there isn't much else I can tell you about this project besides the fact that is was a lot of work. In the end though, my wife is happy, so it was worth it.


Saturday, March 17, 2012

Spring Time Is Here

This week was spring break for my kids. Me and the little ones spent most of it in the shop. I haven't been feeling well, but with their help, I have gotten a lot done.
Most of what we got done though, isn't exactly photo worthy. We done a lot of cleaning and rearranging. As some of you know, my four youngest boys love hanging out in the shop. They have their own tools and build things for themselves. I am proud of this fact for the simple reason that a lot of kids these days wouldn't want to work at building something to play with like my boys do.
However, I also have some good friends that have been giving them tools. In addition to that, they are constantly adding to the things they keep along with their tools that was taking up real estate in the little corner I'd given them. They had outgrown their corner. So it was time to move some things around and give them more space.


I did get a little work done on one of my table saw stations.

When I got the Craftsman setup, I temporarily threw some particle board into the wing extensions until I had time to do better. The plan was always though to build them with substantial hard wood and put a router in the right wing. I finally got this done.

The panels are now made of pecan. The router is mounted under the wing panel closest to the cast iron saw side. This saw also has a function on it I like. It is wired with a keyed two way switch. You flip the key one way to work the table saw, and the other way for the router. This makes it impossible to accidentally, or absent mindedly run them both at one. This is a nice wired in safety feature.


My oldest son has been wanting to have a crawfish boil. I was worried about it because I knew it would be hard on my back doing the work of it. The two oldest boys though, that have left home, both said they'd help, and they did. We had a great time. It was a nice end to the official spring break. I had all my kids, all eight of them, in one place at the same time. I don't know what I enjoyed more, the visit or the food.

I'm sure many of you reading this will understand. You raise your kids right, and you know they'll be alright. There is nothing though like having all of them right in front of you at a given time. When you're sitting there looking out over your yard, and all of them are there, you know that, at that instant, all of them are healthy and everything is right in your world.

Today, as we have finally caught up on everything, I did start a new project.

This is a project I promised to do for my wife some time ago and just hadn't gotten to it yet. Summer is coming though and I think she'd like these done.

This is our patio set. The plastic straps are dry rotted and falling apart. I went and looked at new patio furniture. The prices are way out of my budget, and they are not built as good as these old ones. So I got the idea of saving these.

When I am done with them, I will post the end result and you can see how I save them. I have an interesting idea on how I want to do the job and I think you all will like it.


So that was our spring break.

I have loved spending the week with the boys helping me everyday. I have to admit though, it will also be nice to enjoy the quiet when they leave for school again Monday morning. I hope everyone's spring is turning out to be as nice as mine has so far.


Monday, March 5, 2012

Perfume Tray


This is a small perfume tray I made for my wife. It is one of the present I am giving her this Friday for our anniversary.

It is made of aromatic cedar. It is six inches wide, ten inches long, and five inches tall. It is unfinished except for the bottom because my wife lives the smell of aromatic cedar. I applied Johnson's Paste Wax on the bottom to protect a personal message I wrote on the bottom to her.

If any of you would like to cut and make one of these, the pattern can be found here.

It is designed by Steve Goode. If you are a scroller, be sure to check out his website, Scrollsaw Workshop. There are plenty of free patterns there. However, if you use a lot of his patterns, as I have in the past, and can afford it, please consider making a donation to his site. He puts a lot of time into that site and appreciates all the help he can get with the financial cost of keeping it up. There is a link near the top where anyone can make a donation to his site through PayPal.

Tuesday, February 28, 2012

The Pole Vice Adventure

I apologize to everyone that I'm playing catchup all at once on my blog. The band saw project consumed me for a couple of months. The only time I was not working on it was during times when I didn't feel up to posting either.
Anyway, with all this catchup, it was brought to my attention earlier today that I never did post my pole vice.
These are pole vices. Ever since I seen on a long time ago, I've wanted one. Every time I run across one though, they're always either already halfway gone from rust, or priced through the roof. These things are older than me. The way they are built though, they are solid as the floor they are mounted above. You see, when you hit on them, or anything clamped in them, the vibration is transferred to the point, all the way down to the floor, bot the table it is mounted to. It is one of those fine examples of how they made things right a long time ago.
So I went to a resale shop a while back. As soon as I stepped out of the truck, I seen the pole vice. I checked it and it worked. I almost fainted when the guy gave me the price, twenty dollars. As I about broke my arm trying to get my wallet out, he told me he had another one out back. Since I have a buddy that is trying to get into doing his own blacksmithing, I wound up buying both of them.
Then I got them back to the shop and they sat for a little while. I was still in the middle of the band saw project and my back wasn't up to tackling these at the time. One day, one of my young ones asked why I hadn't done anything with it yet. I jokingly told him that I was waiting on him and his brothers to do it. It happened to be one of those days when I was hurting real bad and didn't feel up to doing much. He took it seriously. Worse, he, and his brothers, wanted to do it. So, although I wasn't sure how far they'd get, I let them start disassembling it and cleaning it.

So they took it apart and cleaned it up with wire brushes and sand paper. I had to stop them at one point. I just wanted the rust knocked off. They were trying to take it down to shiny metal. I wanted the old patina left. They were doing a good job, too good.

Here it is at the point of them cleaning it all up. Remember, these are my little hard working boys that were doing all this.

They looked tired, rust all over their clothes (their mother was going to kill me). So I was a little surprised when they wanted to know what they needed to do to keep it from rusting up again.

Johnson's Paste Wax, like that Frank's Red Hot Commercial, "I put that **** on everything".

Here they are, waxing everything on it. Once again, they were trying to go too far though. I looked down the table at the youngest one, and he was studying a nut. I asked what he was doing. He was trying to figure out how to wax the inside threads of the nut.

After they waxed it, they put it back together. I helped them make my mounting block for it and they mounted it.

I was proud of them. They tackled a job, worked together, and got it done.

I had to take several photos of them with the finished vice. They have every reason to be proud of themselves too. With some elbow grease, they took a tool that is older than probably all of them put together, and made it perfectly usable again. There are not many kids today who would tackle a job like this if you tried to make them, much less ask to do it.

Here it is. I can tell you for a fact since I've had the chance to use it several times, this thing is solid as a rock. You hit it with a hammer and you feel no vibration at all. When something needs whacked on, this is now my go to vice.

I feel proud of my boys too every time I use it.