Find Select Projects Easier

If you're looking for a specific project that I've done, please click here for a categorized list page.

Don't Forget To Leave A Comment

If an article interests you, please click below it where it tells the number of comments and leave one. I appreciate all input.

Get My Blog In Your Email

Enter your email address:

Delivered by FeedBurner

Thursday, July 28, 2011

Very Large Last Supper Portrait

This is another pattern I got from Charles Dearing. I have already done several versions of The Last Supper. However, when I seen the size of this one, I had to doing if for no other reason but to challenge myself. A challenge it was too. I really enjoyed cutting it, but am also glad it's done. I learned an important lesson on this project. Swinging almost five feet of material on the scroll saw is pure hell on a bad back.

That's right, you read that correctly, close to five feet. The actual size of the cutting is eleven and a half inches tall and fifty seven and a half inches long. That's four foot, nine and a half inches. Add an inch all the way around that for the frame and you have one massive portrait. I had to dig deep in my mahogany pile to get long enough material to make these frames.

That isn't the whole story though. I had to adapt the pattern to the wood that I had available at the moment because I didn't have the money to go buy more material. If you go to Charles's photo album, he cut it even large. He is the designer of this pattern, and he cut it over five feet long. So if any of you scrollers out there want a challenge, Charles sells this pattern for less than ten bucks if you dare to try it.

I stack cut this three high like I do all my portraits. I always try to finish cutting within one day's time. I use luan plywood for my portraits, and if I leave the masking tape I use under the pattern on longer than a day it messes up the top layer of veneer on the top cutting. Needles to say, this one definitely took longer than a day. It messed up the top layer of veneer even worse than normal.

So that top layer I was just going to scrap it out to the fancy firewood pile. My wife had other ideas. She wanted it painted and hung in our home. So that one got a grey paint finish and is going to the house.


Tuesday, July 19, 2011

Jesus


I posted so many photo of this project for a reason. I'm hoping readers can find one photo that stands out enough to begin to show this project as well as if you came to my shop to see it. It is one of those projects that if you think the photos look good, you should see the real thing.

This project was quite a challenge on several levels. For one thing, it is huge. Not counting the frame, the cutting itself is twenty inches wide and twenty seven inches tall. It is by far the largest portrait style cutting I have ever attempted. The size created another challenge because all I have is a sixteen inch scroll saw. If it weren't for spiral blades, it would have been impossible for me to complete this cutting.

Another challenge was the delicateness of this cutting. If you look at the photos, the bottom three quarters of Jesus's face is just hanging there in the borders with nothing supporting it. In order to remove that large mass of material between his face and neck, I had to keep using masking tape to hold the cutout area in place as I continued cutting. It scared me a few times. I just new I had broke it, ruining many hours of cutting if I had done so. I breathed a huge sigh of relief when I finally had all three that I stack cut in frames so I could rest assured that I would now not destroy them on accident.

Then finally, another challenge wasn't the cutting itself. It was the fact that this is the first time I've ever built such large picture frames. I learned very quickly while doing so that the miters for large frames have to be absolutely perfect or any mistakes will stick out like a sore thumb.

This pattern was designed by a man named Charles Dearing. He is one of the most talented designers I've ever had the pleasure of knowing. If you click on his name above, you can go to his Facebook page and see some of his other work or get to know a little about him. He is very talented and does do custom patterns if you contact him about it. He does his work for very reasonable prices as well. So if you're wanting a pattern that is a cut above a lot of the offerings out there today, consider contact Charles.
Speaking of his talent, I don't think it comes across so well in photos. I want you all to look closely at the eyes. The entire design is beautiful, but Charles caught something in these eyes that I have never seen. First, if you see it in person, the eyes seem to follow you if you changes the angle that you're viewing the portrait from. I have never seen that in a scroll saw cutting before. Also, for a portrait of Jesus, I have never seen anyone capture the sadness in his eyes so realistically. It's as if you can tell Jesus is on the verge of weeping although there are no tears to tell you that. You can just look at the eyes and feel the sadness.

I hope you all enjoy this one. Now that I have found such a talented designer that brings out the type of detail I like cutting, I hope to cut many more of his designs.


Forgotten Cuttings

I have CRS disease. Any of you who aren't aware of this infliction, it stands for "Can't Remember S....well you can figure out the rest"
Often when I need just a single cutting of a picture I will throw in an extra layer and cut an extra. I do this so that if I mess one up while sanding or from some other unforeseen accident, I have an extra to work with. Then I don't have to start completely over if I mess up. Of course, this means that when everything goes well, I wind up with simply an extra cutting. I usually just frame these to have on hand.
Well, this past Christmas I was running behind building presents. I cut a pegasus for a chest and a wolf for a CD case. In both cases everything went well and I had extra cuttings of both portraits. I didn't have time to frame them at the moment, so I just hung the extra cuttings on my shop wall on a nail to frame at a later date. I had forgotten all about them until I happen to look up earlier today and notice them.
So I didn't cut these today. I just framed them.
They're only about seven months late.


Friday, July 15, 2011

A Wheelbarrow For Potpourri


This is one of those little projects I done just to give me something to work on while I'm not able to stand much. It is a little wheelbarrow for potpourri.


It is three inches wide, eleven inches long, and five inches tall. It is made out of aromatic cedar.


I got the pattern from a book my Mom sent me a year or two ago titled Scroll Saw Fretwork Patterns by Patrick Speilman and James Reidle.


Thursday, July 14, 2011

Cubed

I've been hurting pretty bad for several days and haven't been able to get to the shop. Well this morning I made a decision that I had no choice but to go find something to do. I was starting to hurt mentally as much as physically. I go a little stir crazy when I'm at the house not doing anything. Since my back wasn't up to much though, I decided to take it easy and fiddle around with some puzzle designs I'd seen.

I made a captured ring puzzle. This is turned on the lathe out of a solid piece of wood. When people look at it, their first though is, how did I get the rings on there when the ends are larger than the insides of the rings. The answer is that I didn't get them on there. They were already there. I used the knives on the lathe to turn the surrounding material away, leaving the rings.

Then I made a cube in a cube. This one begs the question, how do you get the small cube inside the large cube when it won't fit through the holes. The answer is, again, you don't get it in, it was there to begin with. The trick is to take away the other material, leaving the small cube.

This one is done on the drill press. You set up a jig to make sure you are drilling in the exact same spot on all six sides of a cube. Then, using the depth stops, you take away a tiny bit of material at a time until the inside cube is just about to break away. Next, you use chisels, a knife, and sandpaper to clean up the cube on the inside and the inside edges of the outside cube.

I took this one to the house to show my kids. After they gave up on figuring it out, I explained to them how I done it. Then they wanted to know what else I could do. That sounded like a challenge to me.

Sooooo.

How about a cube in a cube in a cube?

This one is done exactly like the cube in a cube, only with a little more complication. You do it all the same way. However, you first do the tiny cube in the very center. After you have it complete, you cut away material to make the middle cube. While doing the middle cube, you have to be careful of where the inside cube is to make sure your bit does not come into contact with it and mess it up.

There are tons of articles and even videos on YouTube on how to make any one of these puzzles. However, if any of you have problems or can't find the information and are interested in making some, let me know and I'll see if I can find the links to some videos for you.


Saturday, July 9, 2011

The Vicksburg Queen

When I was a child, I remember my Mom taking me down to the Vicksburg water front to see the Mississippi Queen that was docked there. I love water and I love boats, but that huge paddle wheel boat was the most beautiful thing I'd ever seen.
A group I'm a part of is having a contest. The theme is bird houses. I hate building bird houses. Right after seeing the theme for the contest though, I seen a birdhouse with a boat theme, had this idea, and decided to build it.


I spent many hours on this project, but it is not just for show. It is a fully functioning bird house, that is not mounted on a post in my front yard.


It wound up being fifty four inches long, twelve inches wide, and fourteen inches tall, not counting the smoke stacks. It has sixteen individual compartments with eight entry holes on each side for the feathered friends to access them.


I made sure the paddle wheel could be moved by hand because I figured everyone who got near it would try to do so. I was right. Every single person who has been in my shop since I started construction has immediately reached for the paddle wheel to turn it.


It has spiral staircases off the front main deck.


The little handrails that go around all five deck turned into a project all in itself. By the time I got through with them, it wound up consisting of one hundred and seventy little tiny posts that had a total of sixty feet of metal wire running through it all.


As my regular readers know, I always reveal where to get plans for anything I build. That is going to be hard to do on this project. Somehow, I just had an inspiration to build it. There are no plans. I made it up as I went along. I didn't write anything down or make any drawings. So I guess this bird house is just going to have to be and original. I think in the future I may have to find inspiration to try more projects like this. I enjoyed just building it as I went and not being tied to any kind of plans.


Monday, July 4, 2011

The Dragon Pattern Hunt

After "Merlin And The Dragon" on Friday, I received several e-mails wishing for more information about the pattern for the dragon. I sent an email to Willy B., but had not received any word back by this afternoon. It's a holiday weekend, and I figured he's busy with family. So, I went dragon hunting.
I found the dragon pattern. Willy pulled a fast one on us though. The pattern is a very nice one of a dragon. However, the tree is added to the dragon by Willy. I won't know until I hear from him if the tree pattern is from elsewhere or if he drew it. I did find the dragon though.
The pattern for the dragon can be found at The Art Factory. As you can see, I linked the pattern and the Art Factory. I done so because I hope some of you take the time to check out the Art Factory website while you're there.
The Art Factory is the new website showcasing the amazing work of Dirk Boelman. If any of you are experienced scroller, you may recognize Dirk's name from numerous patterns from all over the place. I place him in regard as one of the greatest scroll saw pattern designers of all time. He does extraordinary work. Be sure to check him out.

A Work In Progress

I wanted to come show you all what I'm working on at the moment. I'm building a bird house. For the ones of you that know me though, even a bird house I can find a way of over-complicating it.
When done, this birdhouse will have sixteen individual compartments. It'll be twelve inches wide, twelve inches tall, and over four foot long. I haven't decided on a name yet, but I'm going for something themed after the Mississippi Queen.
The Mississippi Queen was a steam powered paddle wheel boat that cruised up and down the Mississippi River for a number of year. I have always been in awe of the beauty of these magnificent vessels. Although I am themeing this after this famous boat, I won't name it as such, for the simple reason that there is no way I could possibly match the beauty of the real thing no matter how hard I try.
When done, not only will this bird house be in my yard. It will also be entered in a contest for which first prize is five hundred dollars. So wish me luck.

Friday, July 1, 2011

Merlin And The Dragon


This is the result of two pieces that were put together in front of a piece of stained glass. It is done in three eighths thick red oak, with a three quarter inch thick piece of red oak for the base. All this comes togehter to make one stunning display.

This was done by our friend Willy B. He says this is smaller than what he has shown us before. Well Willy, it is still a beautiful piece. Keep up the good work. I hope you continue to share that work with us too.


Saturday, June 25, 2011

The Iowan


This clock is called the Iowan. The plans to build it can be purchased here at Wildwood Designs. If any of you are interested in building it, it is much easier to build than it may look. It does take a while to do all the detailed fretwork. If built in stages as the plans explain though using false plates, it is a relatively simple project.

I built this one using mahogany with mahogany trim. I finished it with three coats of Zinsser clear shellac.

I usually don't put finishes on a lot of my detailed fretwork because it is just so time consuming to apply finish with all those tiny cutouts. I've been considering it lately though and wanted to do a nice clock and take the time to finish it just to see if the improvement of a finish would be worth it. I must admit, I think I will be applying finish to more of my fretwork in the future. The difference of the finished and unfinished piece is simply like night and day.

I did change a few minor details when I built this one. The final size of this clock as I built it is thirty six inches tall, eight teen inches wides, and ten inches deep.


Tuesday, June 14, 2011

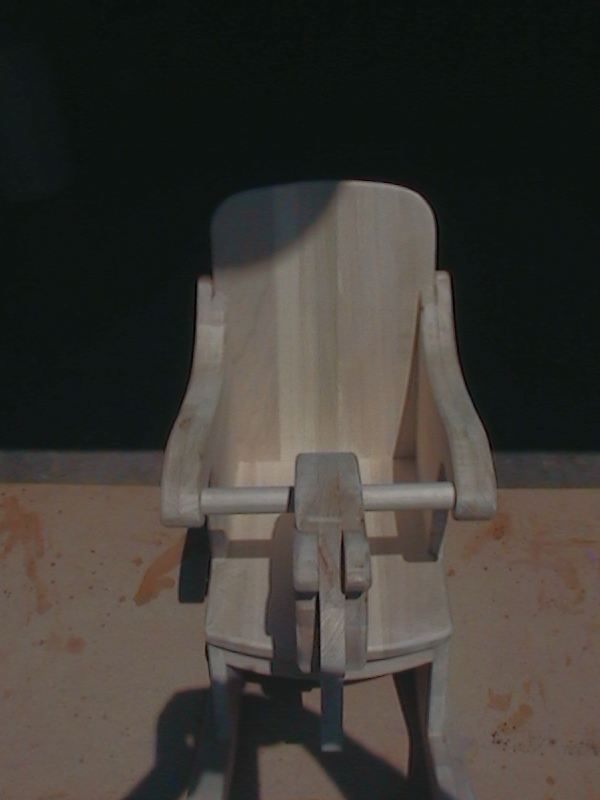
Rocking Horse Chair


This is a great project for a beginner or any wood worker who is looking for a project that looks great, but is simple to build. You can purchase the plans here. The whole project can be made using three, eight foot long, one by twelves. The plans show you how to lay it out to get it all with just those three pieces of wood. I cut my pieces out on a scroll saw. It could easily be cut though using a band saw or jig saw.


I built one of these last year for a friend of mine. This one is for that same friend's brother. It is unfinished because their mother is painting them. I seen the one I built last year after it was painted and she really added character to it.


This one is made out of cottonwood. It is meant for small children who are to small for a regular rocking horse, but can hold themselves upright without assistance. The plans say from twelve to twenty four months. That seems about right to me.


The only difference in the ones I've built and the plans is that there is supposed to be a star cut in the sides of the rocker area, and the back of the seat. I decided to eliminate this because I seen it as a pinching hazard for the small children it is designed for.


Book Stand From A Combined Effort


A good friend of mine made one of these and I wanted to make one for my wife. After he showed me how you make it though, I was a little discouraged. The way to make these involves chisels hand saws. I don't do hand tools. I would love too. I am fascinated with the skill that goes into creating things strictly out of hand tools like they did before the invention of all the power tools. I have tried though and my messed up back doesn't allow that. So I stick to my power tools. So my friend came up with an idea.

He lives about forty five minutes from me, but comes to visit from time to time. So he done the chisel work on this book stand and brought it to me. Then I cut the unicorn design in it. On his next visit, he done the hand saw work on it, leaving me to just do some sanding and finish work to complete it.

Some of you may look at this project and wonder why all the work for such a simple project. You could probably easily create something much easier to build that will accomplish the same job. I like things that are different though. This book stand is made using one solid piece of wood. There is no kind of fasteners like nails or screws. It is just a piece of wood with some angles cut into it. If you look closely you can see these angles in the last photo. Then after slicing it down the middle it opens up to create a simple book stand.

This is designed for the kitchen. The last photo shows how it folds up to be placed out of the way into a drawer. Then it can be taken out and opened up to place a book, cook book for example, on it. This keeps the book up off the counter top so you don't have to worry about it getting into spilled liquids or getting in the way.

I also enjoyed making a project with a buddy that lives that far away without actually being in the same shop at the same time. It made for an interesting time. It also gave us a reason to meet up and kill a few pots of coffee.


Thursday, June 9, 2011

Chinese Tea Table


Here's is another beautiful project by Willy B. The plans for this can be found at Wildwood Designs. Willy made this out of three eighths thick red oak. Of course he changed a few things to make it more his own.

He enclosed the top and the upper sides with stained glass. He changed the top to a dove design instead of what came with the plans. Then, to set all that off, he added a light under the table top that shines through, creating a dramatic effect.

I hope everyone else is enjoying Willy's work as much as I am.


Monday, June 6, 2011

Jewelry Cabinet by Willy B.


This is a project Willy B. built from plans in an old Woodsmith magazine that he made some modifications to in order to make it to his liking. It stands five feet tall with a top section that he designed himself. It is made out of red oak with legs that he also designed and built himself. It is twenty one inches wide and fifteen inches deep.


The top section he designed to hold pieces that are worn often. Each drawer he made separations in and lined with red felt. The first drawer holds rings, the second has twelve small compartments for small items. The separations get larger as you go down until the last couple are full drawers. When you open the L-shaped sides it reveals hooks on each side to hang necklaces on.


Willy, this is another fine project. You can really see the dedication to quality in each of your pieces of work.