Find Select Projects Easier

If you're looking for a specific project that I've done, please click here for a categorized list page.

Don't Forget To Leave A Comment

If an article interests you, please click below it where it tells the number of comments and leave one. I appreciate all input.

Get My Blog In Your Email

Enter your email address:

Delivered by FeedBurner

Friday, October 19, 2012

Drill Press Table

 
For some time I have been unhappy with my drill press table. I bought this thing at Harbour Freight. I got it cheap because I had no intentions of using it permanently. Unfortunately, because of various reasons, such as just not wanting to get started on it, I still hadn't gotten around to building anything better. This table, actually, is a pretty good one. It probably would be perfect for a smaller, table top version, drill press. For my big floor model though, it just wasn't large enough. One of the advantage to a drill press table is the ability to use a fence. With this small table, the fence went only about two inches past the quill. Therefore, anything with holes further than that from an edge, and you were still without the use of a proper fence.
 
Then I recently seen a neat shop made drill press table on a freind's blog. I immediately thought about building something similar. A few days ago, I set out to do just that. I started taking measurements and planning. As I took a break though, I sat there over coffee and had a thought. What was I doing? Yes, my friend had built one nice table. However, I did not need or want all those neat features he incorporated into his. All I really needed was a simple table that was large enough. Yes, all the bells and whistles are nice, but what good are they if you don't need them?


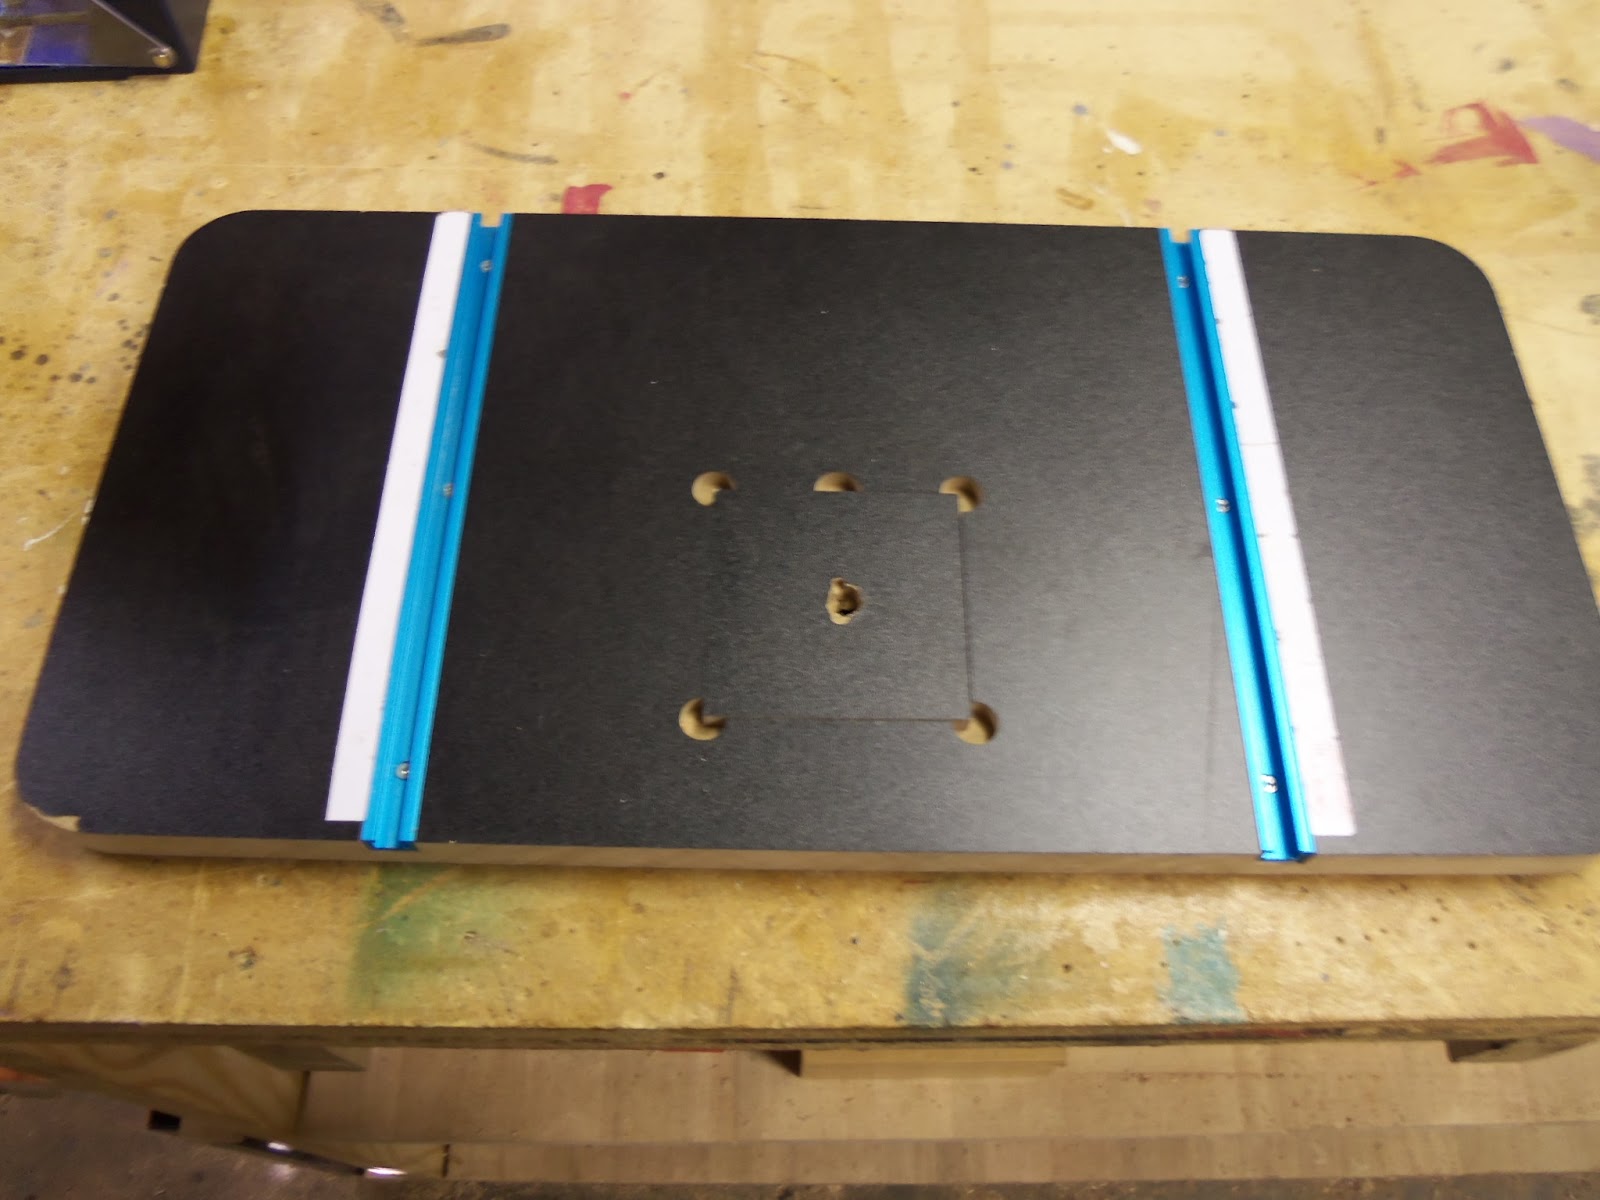
So that's what I done. I am happy with this table and it has everything I need in a table. It is large enough. It has a workable fence that slides all the way back to the post, giving me maximum usable capacity. It has a replaceable insert. It has parellel T-track so I can clamp things down if needed. What more can you ask from a drill press table?


I made it out of pecan. I use pecan for a lot of my shop made accessories. There is no special reason for this besides I think it is a beautiful wood and it is stable enough for most things. Because a drill press table needs to stay flat though, I backed this piece of pecan with a three quarter inch piece of plywood.
For now, I'm still using the fence from the old table. I only have three quarter inch thick pecan. I want a solid fence without lamination. So as soon as I can find me a thick enough piece of pecan, I will make a matching fence. Until then, the MDF from the Harbour Freight model will have to do. 


Loading Block

My Dad is a member of the Single Action Shooting Society. If you'd like, you can read more about that great organization here.
He uses something called a loading block, which you see above, during competitions. The one he has somehow has gotten a chunk broken out of one corner of it. So he brought it to me around a year ago to make him another one. I told him too because, from looking at it, I thought it would be simple to make. I forgot something though. Sometimes, the simplest things can turn out to be difficult.
 
First, I'll show how this works, then I'll explain why it was difficult.
My Dad uses a .45 Long Colt shell. As you can see from this photo, opening the lid exposes the primer end of those shells. The lid protect the primers from getting hit, while also keeping the shells pushed down into the block.
With the lid closed, you can see how the bullet end sticks out the bottom. I know, this in the photo doesn't look like a normal bullet. Actually, it is empty brass. I don't own a .45 Long Colt, so all I had at the time I took these photos to show was some empty brass my Dad left for me to do this project.
With the lid open and the block set down on a flat surface, the shell is pushed upwards, making them easier to grab ahold to.
 
Now, why was this so hard?
Well, at first I though this was just a block of wood with a bunch of holes in it. All I had to do was use the empty brass and find the right size hole. What I did not take into account though was, with all those holes so close together, the wood would tearout, and sometimes just bust out, when the drill bit exited the bottom of the block.
I tried several different ways to get this done successfully. I tried twist drill bits, brad point drill bits, modified drill bits, forstner bits. I even filed down a router bit hoping for success. Everything produced the same results when exiting the bottom. It didn't matter how tightly I clamped it to a backer board. It was just too many holes in a small amount of space.
Then a few weeks ago, I was watching a wood working video on the internet. This guy drill a bunch of holes. To prevent tearout, he explained, he drilled stopped holes within a quarter inch of the bottom and then cut off the bottom, leaving clean holes. As soon as I seen it I had one of those "duh" moments. Although it was late in the evening, I couldn't wait. I had to get to the shop that instant and try this out.
So, although the block section is only seven eighths an inch thick, I started with a block that was over an inch thick. I drill all the holes, then used my band saw to slice off the bottom. It humbled me to figure this out after all this time.
For a year my Dad has been waiting on my to do this. I imagine at time he may have thought I'd forgotten about it. It took only getting the right idea on how to do it though, and it was an easy project. Look for more of these in the future. Now that I know the trick, I have a couple of ideas on more personalized versions.


Wednesday, October 17, 2012

A Story Of A Lamp


Today, I finished a lamp that has taken me the better part of two weeks to build. Now, I know some of you may be wondering why it took so long. Well, it's because this project has been more of an adventure than a project.
 
To start with, a friend from one of my wood working groups sent me two pieces of wood, what you see in the above photo. On the left is lacewood, and the other is birdseye maple. Well, I don't get the opportunity to work with such beautiful wood very often. So, when I do, I try to make something special with it. With this wood, I decided to make my wife a bedside lamp.
 
I went through several design ideas in my head. I finally settled on a hexagon body shape. In order to do this, I was going to have to resaw the pieces into much thinner layers in order to have enough wood. That, while working with wood you can't just run out and buy more of if you mess up, is an uncomfortable position to be in itself.
To add to this anxiety though, I was doing this on a saw that I built myself. Some of you may remember the sixteen inch monster I built earlier this year. I have to admit though, if the anxiety level of this scenario seems daunting, it makes the delight of successfully doing it on a saw I built with my own two hands even more rewarding.
 
So anyway, all went well with the resawing and I built the hexagon shaped lamp body out of sapelle with lacewood panels. So far, things were looking good. Then it came time to add the top to the body. Nothing I could pull up out of my shop looked good. The straight across grain of it all took away and ruined, in my opinion, the hard work I'd put into the sides.
It became time to move out of my comfort zone again. I hate angles. There, I said it and got it out of the way quickly. I hate angles. To do what I wanted to do with this top though, I was going to need twelve pieces of sapelle with sixty degree angles on them.
This is the first time I've really put my Incra sled to the test. I acquired this gem in a trade about a year ago. It's been a good sled. I now know though, that it really shines when it comes to awkward angles.
Here is the top I made for the lamp body. This, to me, looked a lot better than the straight across grain I contemplated before trying this. This is exactly why I love wood work. No matter how long you do this, or what you create, there's always more to learn.
 
So here is the finished lamp.
The lamp itself is sapelle, with lacewood panels. The lamp shade is sycamore with birdseye maple panels.
After all this work, and because it was for my wife, I wanted a super nice finish. So I started with three coats of Watco Danish Oil. On top of that is three coats of Minwax gloss polyurethane. Then I finished it off with Johnson's Paste Wax and a thorough buffing.
 

I guess the only thing I can add to that is to show it lit up.


I'm Not A Collector

I have gotten on this hand plane kick over the last year. In the past, I didn't even like the things. It was always too hard on my back to use them. Once I acquired a decent set of oil stones and learned how to properly sharpen them and tune them up, it became a pleasure to use them. Don't get me wrong, I still believe in the Tim "The Tool Man" way of doing things when possible, but from time to time, it is relaxing to me to save a few electrons and use hand tools.
 
Anyway, I have been setting these on a shelf in my shop as I get them. I never intended to have more than one or two. I keep finding deals I just can't pass up though. For instance, I recently bought a #4 Stanley from the early 1950s for a grand total of one buck. It amazes me. Some people practically give these away because, as I've learned, a lot of other people buy them cheap just to hang on a wall and "collect" them. Well, my friends, I would wouldn't say I'd ever go strictly hand tools, but I will say this. I am not a collector, I am a user.
 
Last week, I started to realize a small problem. I had filled up that small shelf that I had started setting my planes on, and was half way through filling up another one. It was time to take action before this usable collection gets out of hand.
So I found it was time to take one end of my middle work bench, which I use for tool storage mostly, and build a plane till. All the center dividers are only screwed down. This allows me to move things around at a later date if I happen across anymore deals I can't pass up on new hand tools.